Pens
IMPORTANT: When using this feature, certain column headers and data will only display if your dairy has FeedComp or FeedWatch integrated with PULSE.
Only users who are assigned a role with Herd Write permissions can edit data or customize settings.
See the topics below to learn more:
- Know Your VAS PULSE VersionKnow Your VAS PULSE Version
- Edit Dairy User PermissionsEdit Dairy User Permissions
- Manage Dairy RolesManage Dairy Roles
You can manage PULSE pens and zones on the Pens page. You can find this feature under the Dairy menuDairy menu.
At the top left of the page, click the Pens tab to view all available pens in PULSE. Or, click the Zones tab to view all available zones.
Expand the sections below to learn more:
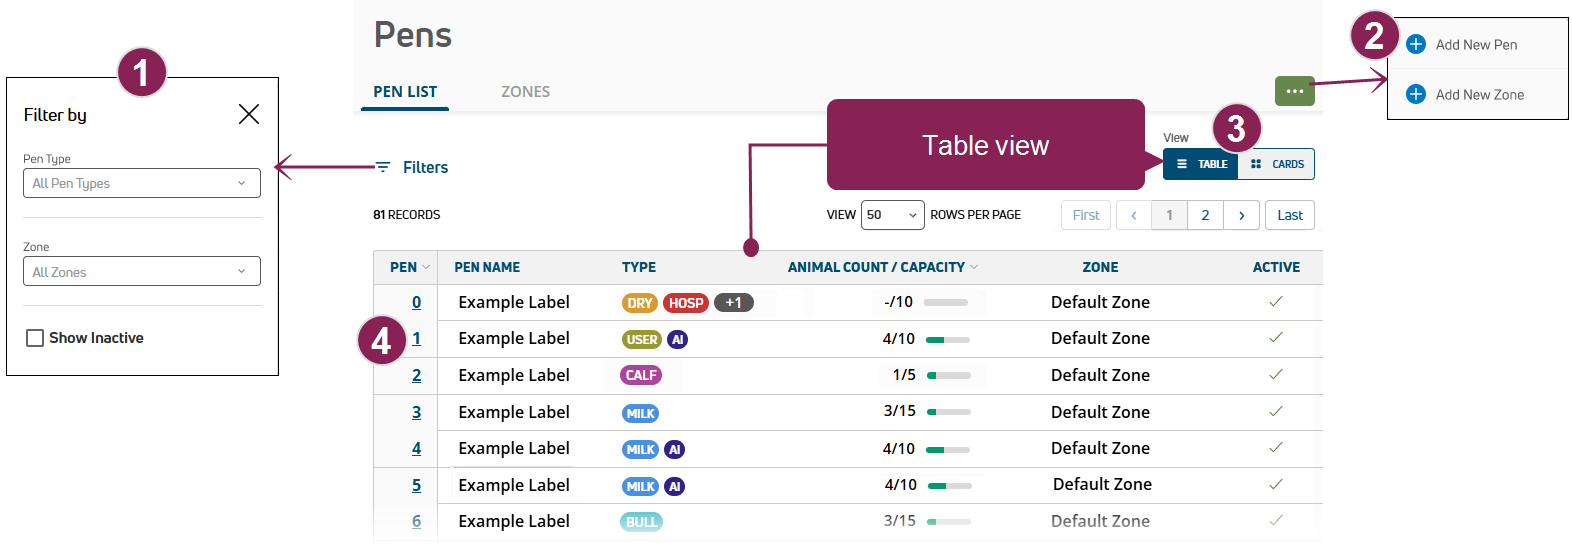
Options to search and filter the pens list are available at the top of the page. Follow the guidelines below when working with the pens list:
- Click Filters at the top left of the page to limit the data that is displayed. The Filters side panel opens.
- Select Pen Types to limit the list to a specific type of pen. Multiple types can be selected.
- Select a Zone to limit the list to a specific zone. Multiple zones can be selected.
- Active pens are displayed by default. Check the Show Inactive box to view all available pens in the list.
- Click the Clear Filters option to clear all of the filters currently applied.
- Select an option in View Rows Per Page to change how many records are displayed on the page, and click the navigation options to jump to a specific page.
Click the Options button  at the top right of the page, and then select Add New Pen. The Pen Details side panel opens. Follow the guidelines below when adding pens:
- Click the Active Pen toggle to activate or deactivate the pen.
- In Pen Number, you can enter a number up to 999, as long as the number hasn't already been assigned to another pen. If you attempt to enter an existing pen number, the system will display an error message.
- The Pen Name entered must be unique and cannot match the name of existing pens.
- Select Pen Types to limit the list to a specific type of pen. Multiple types can be selected.
- You must select a Pen Zone from the drop-down list.
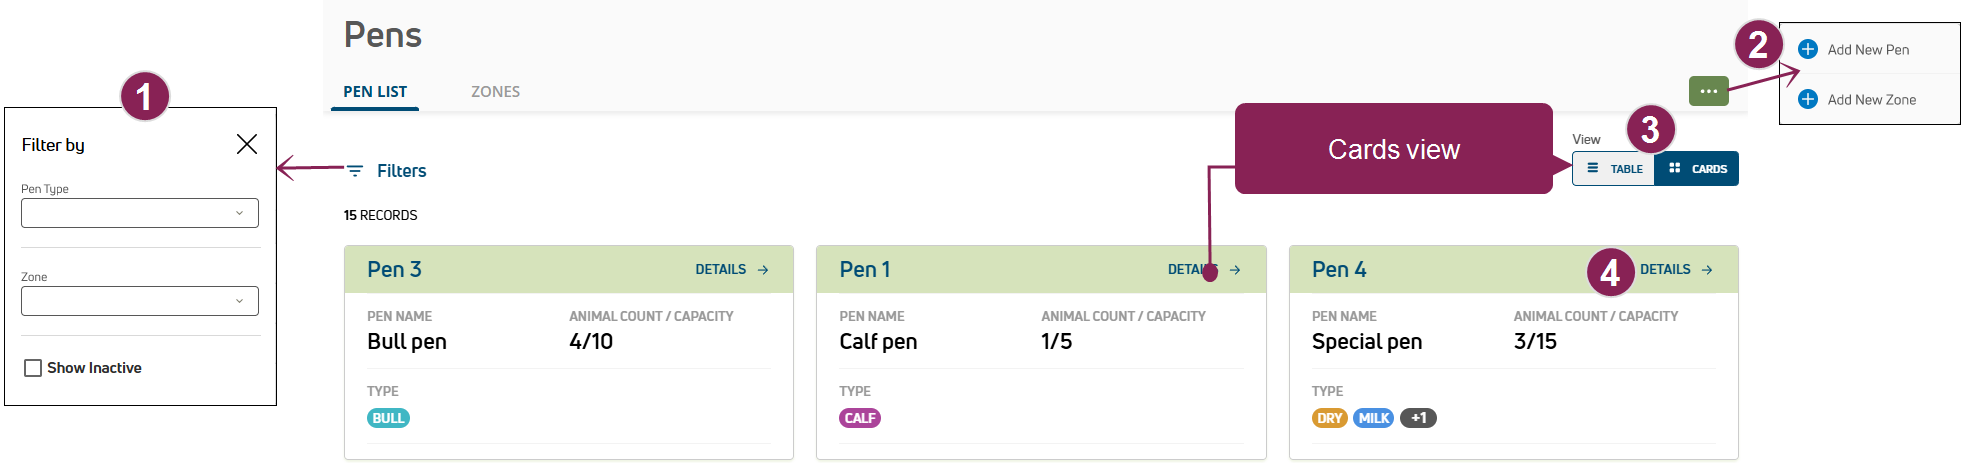
You can view pen information in Table view or Cards view. Follow the guidelines below when viewing the pens list:
- Pen: The pen number. To view pen details in Table view, click a pen number in the table. Or, click Details at the top right of a pen card in Cards view. See View Pen DetailsView Pen Details to learn more.
- Pen Name: The pen name set by your dairy.
- Type: The pen type. Pen types are color-coded for quick identification.
When more than 2 pen types are assigned to a pen, a number is displayed that indicates how many additional types are assigned to the pen. Hover over the number to see the additional types assigned. The default colors for pen types are as follows:
AI
BULL
CALF
DRY
HOSP
MILK
USER
- Animal Count/Capacity: The current number of animals in the pen and the capacity of the pen. A colored bar shows the status of the pen.
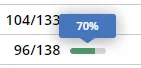
You can hover over the status bar to view the animals/pen capacity value as a percentage.
 : 0-75% full
 : 76-90% full
 : 91-100% full
 : Exceeds capacity
- Zone: The name of the zone to which the pen is currently assigned.
- Active: Icons indicate whether the pen is active
 or inactive
  . See Deactivate or Reactivate PensDeactivate or Reactivate Pens to learn more.
You can open the Pen Details page from Table viewTable view or Cards viewCards view:
- In Table view: Click the ID of a pen to open the Pen Details page.
- In Cards view: Click the Details link at the top right of a pen card to view the pen's details. The Pen Details page opens.
Follow the guidelines below when viewing pen details:
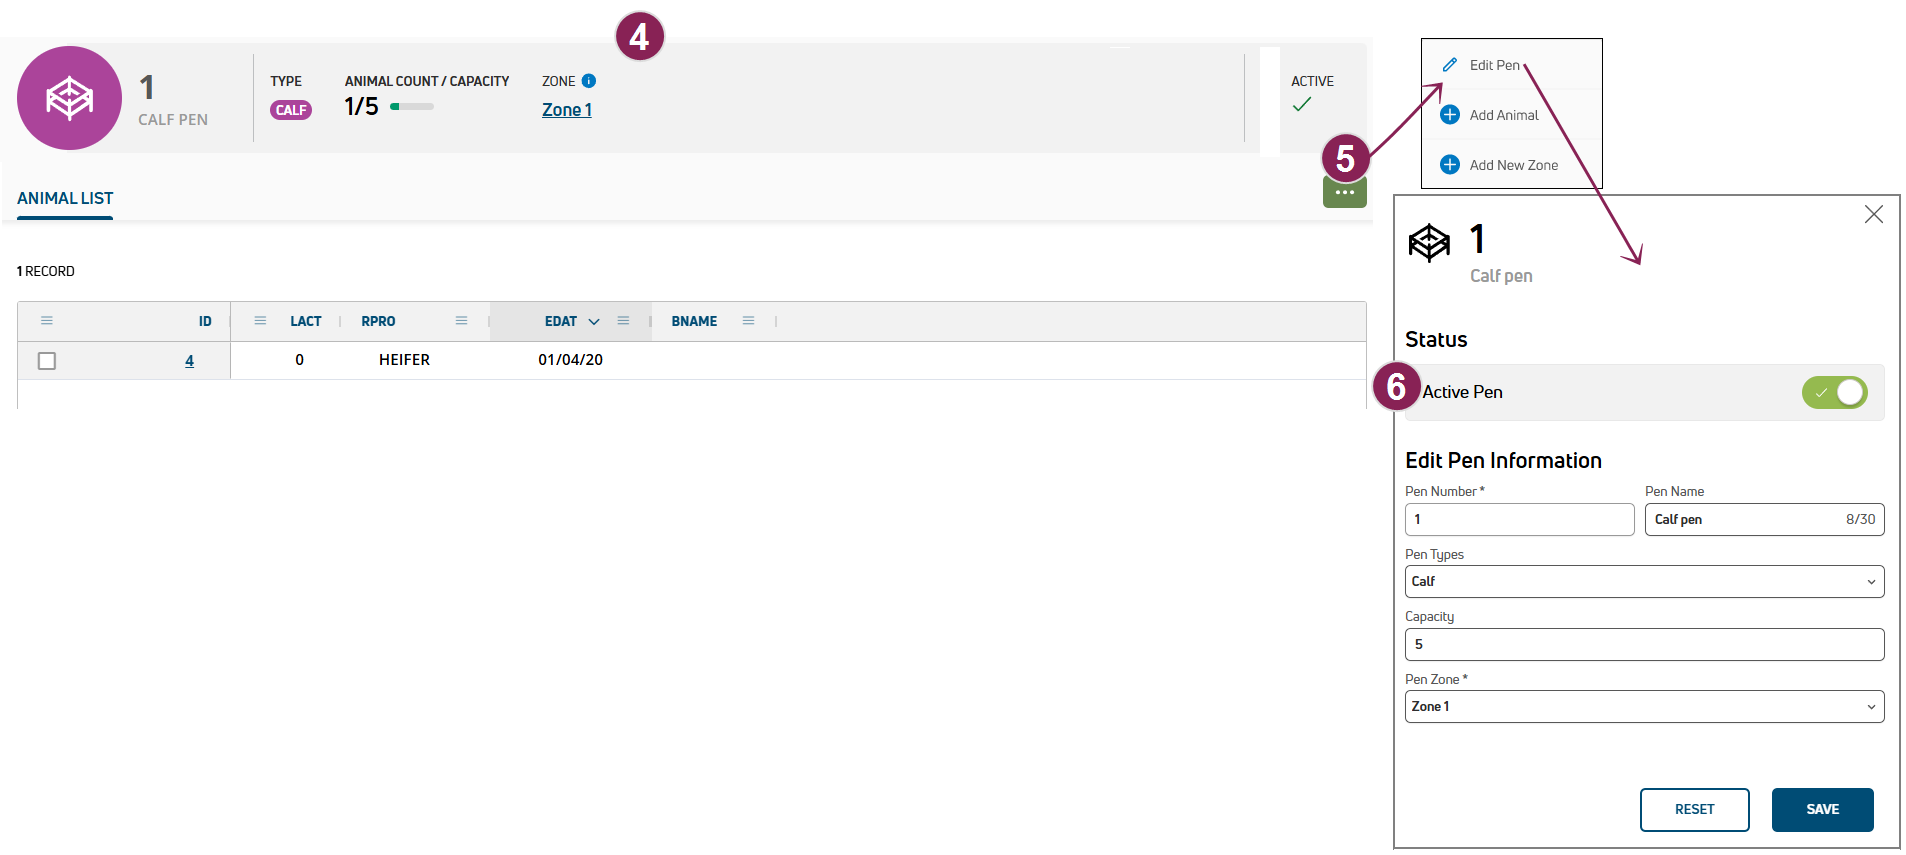
- Pen Details: Details about the pen are displayed at the top of the page.
- Pen Number: The pen number set by your dairy.
- Pen Name: The pen name set by your dairy.
- Type: The pen type. Pen types are color-coded for quick identification. Click here to learn more about pen types!Click here to learn more about pen types!
- Zone: The name of the zone to which the pen is currently assigned. Click the Zone name to view its detailsdetails.
- Active/Inactive: Icons indicate whether the pen is active or inactive . See Deactivate or Reactivate PensDeactivate or Reactivate Pens to deactivate or reactivate pens.
- Pen Options: Click the Options button at the top right of the page, and then select an option from the menu. Click the following links to learn more about the options available:
- Edit PenEdit Pen
- Add AnimalAdd Animal
- Add New ZoneAdd New Zone
- Animal List: A list of animals that have been added to the pen are displayed in the Animal List table. Click on an animal's ID in the table to open a side panel and view its details.
Clicking the animal's ID in the column opens a side panel that displays details about the animal.
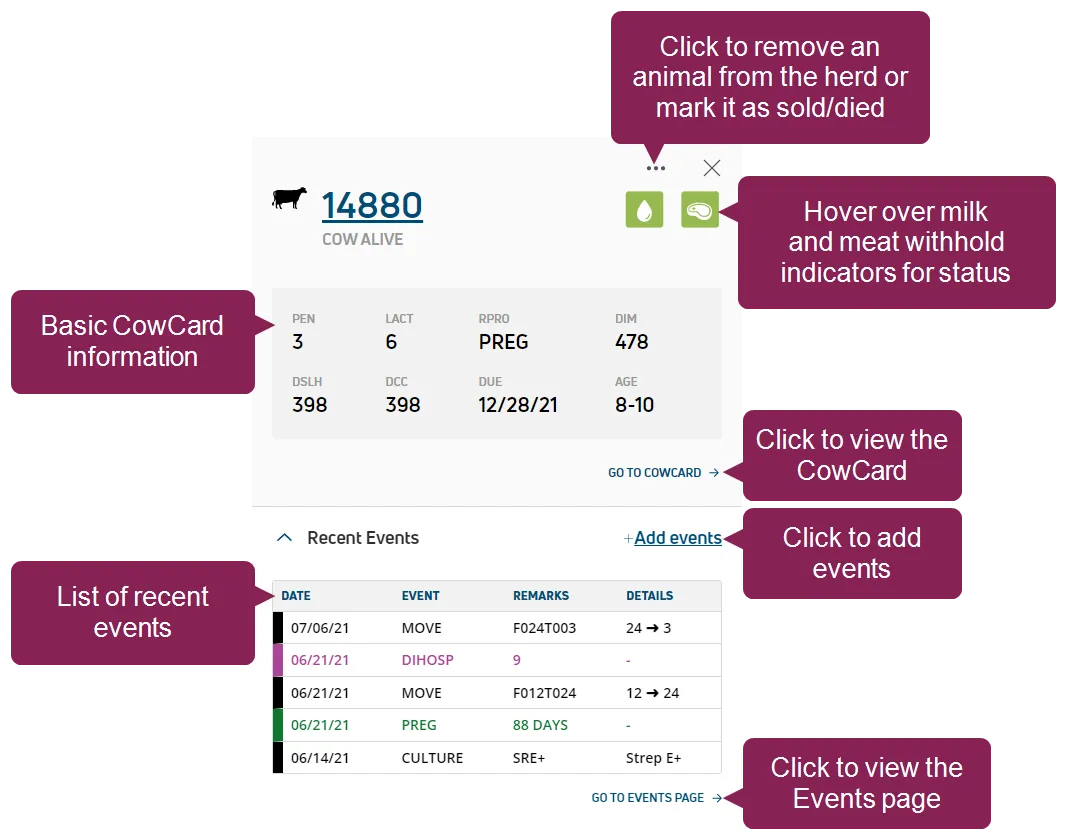
See View Animal DetailsView Animal Details to learn more about the information displayed in the side panel.
In the side panel, you can use the left and right arrow keys on your keyboard to step through side panels for the next/previous animals in the list. To close the side panel, click the X button in the top-right corner or press the Esc key.
To view a full list of animals in the dairy, see the AnimalsAnimals topic.
Check the box in the ID column add an event for the animal.
When a box is checked in the ID column for one or more animals, PULSE displays a message indicating the total number of animals that have been selected.
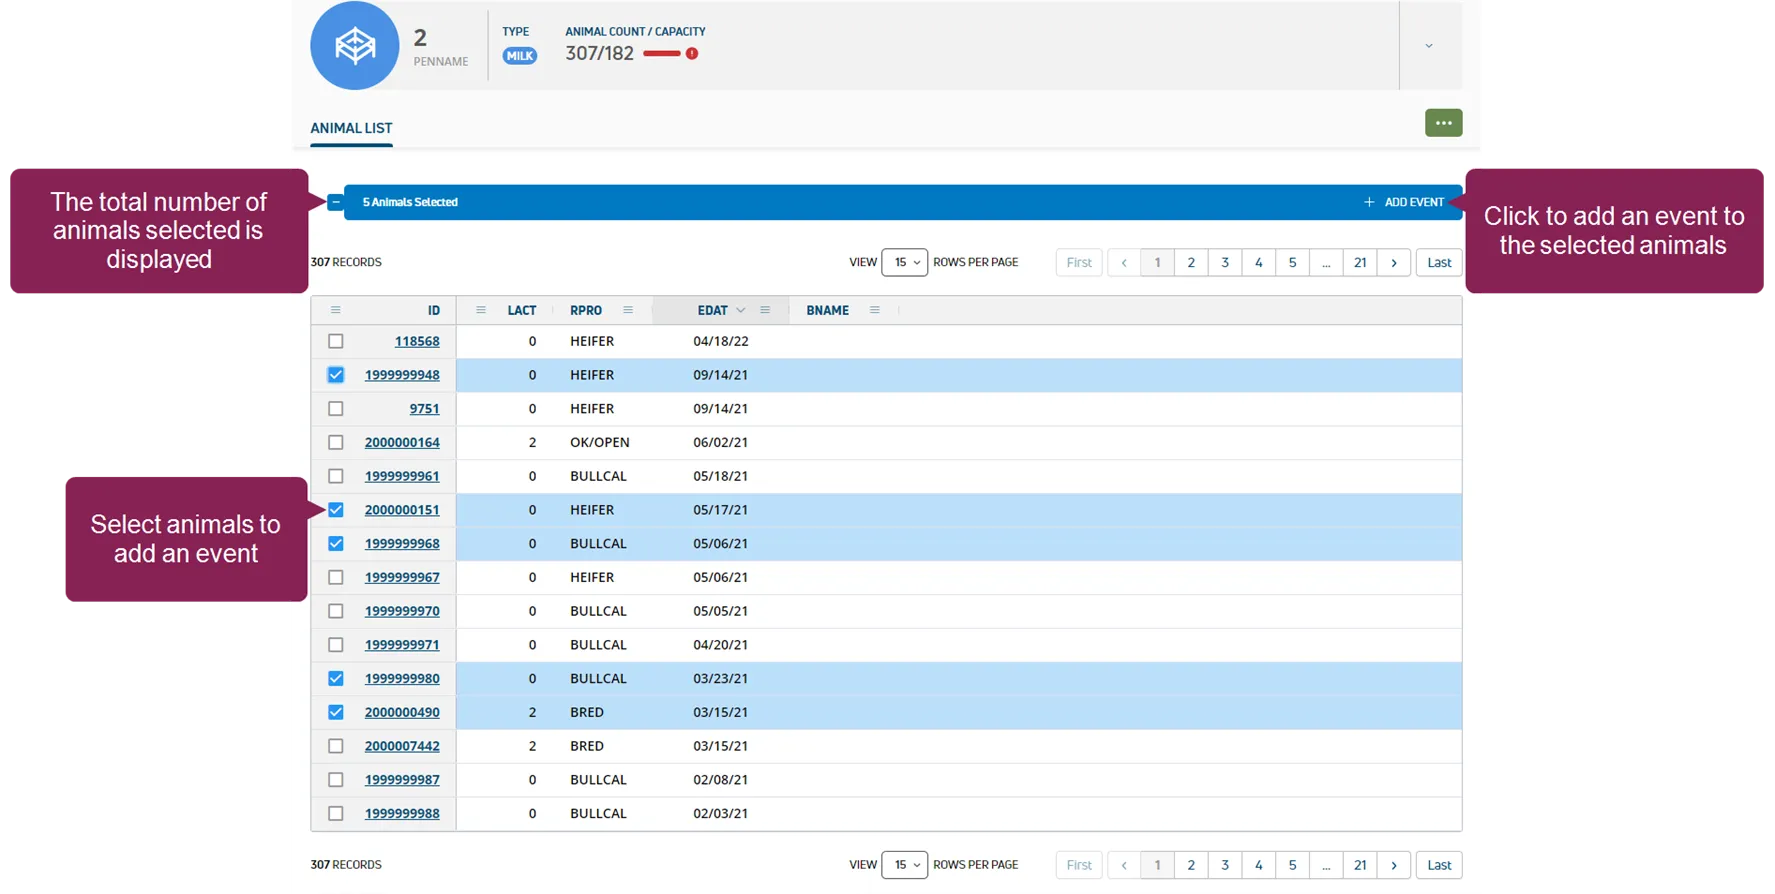
Click Add Event to open a side panel and enter information for the new event.
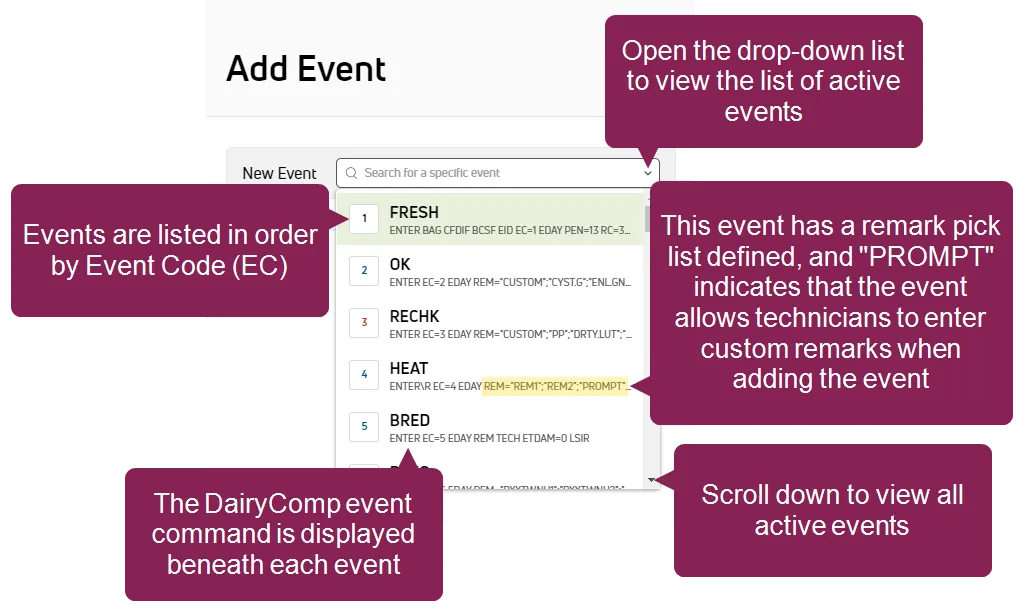
See Add EventsAdd Events for instructions.
Open the Pen Details page. See View Pen DetailsView Pen Details for more information.
Click the Options button at the top right of the page, and then select Edit Pen. The Pen Details side panel opens. From here, you can change the pen details, and:
- Deactivate PenDeactivate Pen
- Reactivate PenReactivate Pen
TIP: Don't see the pen? Click Filters at the top left of the page and then check the Show Inactive box to view all available pens in the list.
- Open the Pen Details page. See View Pen DetailsView Pen Details for more information.
- Click the Options button at the top right of the page, and then select Add Animal. The Add Animal wizard opens.
- Add the animal details in the wizard. See Add a Single AnimalAdd a Single Animal to learn more about the Add Animal wizard.
- Open the Pen Details page. See View Pen DetailsView Pen Details for more information.
- Click the Options button at the top right of the page, and then select Add New Zone. The Add New Zone window opens.
- Add the zone details. See Create New ZoneCreate New Zone to learn more about adding zones.
NOTE: If you deactivate a pen, the pen will be removed from all scheduled feedings.
- Open the Pen Details page. See View Pen DetailsView Pen Details for more information.
- Click the Options button at the top right of the page, and then select Edit Pen. The Pen Details side panel opens.
- Click the Active Pen toggle to inactivate the pen.
- Click Save at the bottom right of the side panel.
- Click Filters at the top left of the page.
- Check the Show Inactive box to view all available pens in the list.
- Open the Pen Details page. See View Pen DetailsView Pen Details for more information.
- Click the Options button at the top right of the page, and then select Edit Pen. The Pen Details side panel opens.
- Click the Active Pen toggle to activate the pen.
- Click Save at the bottom right of the side panel.
Expand the sections below to learn more:
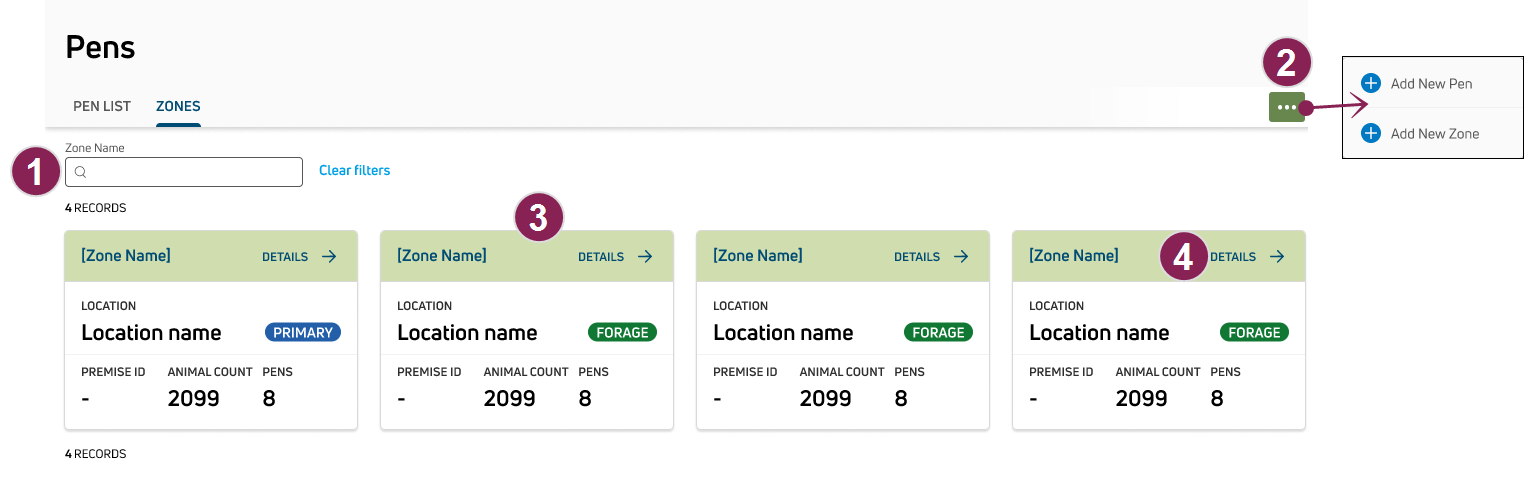
Options to search and filter the zones list are available at the top of the page. Follow the guidelines below when working with the zones list:
- Type text in the Name field to search the list of zones by name.
- Click the Clear Filter option to clear the filter currently applied.
Click the Options button at the top right of the page, and then select Add New Pen. Follow the guidelines in PensPens to create a new pen.
Click the Options button at the top right of the page, and then select Add New Zone. The Add New Zone window opens. Follow the guidelines below when adding zones:
- The name entered must be unique and cannot match the name of existing zones.
- Multiple pens can be selected in Pens.
Follow the guidelines below when viewing zone cards:
- Zone Number: The zone number set by your dairy.
- Zone Name: The zone name set by your dairy.
- Details: Click the Details link at the top right of a zone card to View Zone DetailsView Zone Details.
- Location: The name of the location where the zone is currently located.
- Type: The zone type in a color-coded label.
- Premise ID: The identifier for the pen's assigned zone. See Add Pens to a ZoneAdd Pens to a Zone to learn more.
- Animal Count: The current number of animals in the zone.
- Pens: The current number of pens in the zone.
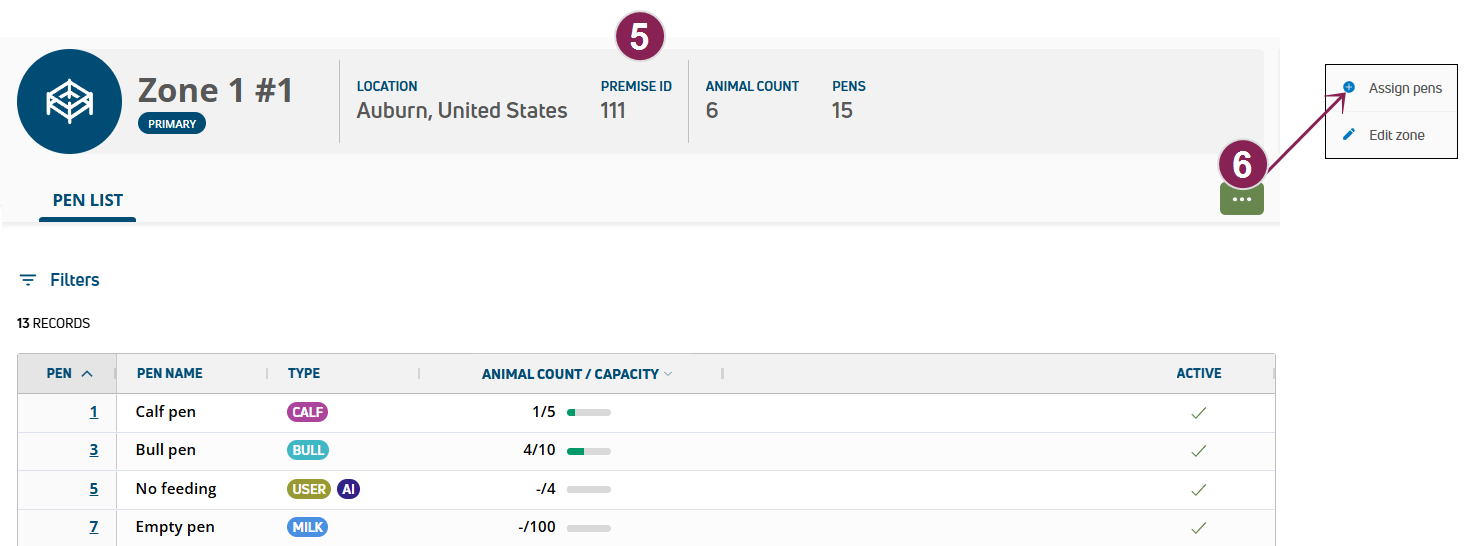
Click the Details link at the top right of a zone card to view the zone's details. The Zone Details page opens. Follow the guidelines below when viewing zone details:
- Zone Details: Details about the zone are displayed at the top of the page.
- Zone Name: The zone name set by your dairy. The zone type is displayed below the zone name in a color-coded label.
- Location: The name of the location where the zone is currently located.
- Premise ID: The identifier for the pen's assigned zone. See Add Pens to a ZoneAdd Pens to a Zone to learn more.
- Animal Count: The current number of animals in the zone.
- Pens: The current number of pens in the zone.
- Zone Options: Click the Options button at the top right of the page, and then select an option from the menu. Click the following links to learn more about the options available:
- Assign PensAssign Pens
- Edit ZoneEdit Zone
- Pen List: A list of pens that are currently assigned to the zone are displayed in the Pens table.
Follow the guidelines below when viewing the pens list:
- Filter the List:
- Click Filters at the top left of the page to limit the data that is displayed. The Filters side panel opens.
- Select Pen Types to limit the list to a specific type of pen. Multiple types can be selected.
- Active pens are displayed by default. Check the Show Inactive box to view all available pens in the list. Icons indicate whether the pen is active or inactive .
- Click the Clear Filter option to clear all of the filters currently applied.
- Pen: The pen number. You can click the number of a pen to open the Pen Details page and view more information. See View Pen DetailsView Pen Details to learn more.
- Pen Name: The pen name set by your dairy.
- Type: The pen type in a color-coded label.
When more than 2 pen types are assigned to a pen, a number is displayed that indicates how many additional types are assigned to the pen. Hover over the number to see the additional types assigned. The default colors for pen types are as follows:
AI
BULL
CALF
DRY
HOSP
MILK
USER
- Animal Count/Capacity: The current number of animals in the pen and the capacity of the pen. A colored bar shows the status of the pen.
You can hover over the status bar to view the animals/pen capacity value as a percentage.
: 0-75% full
: 76-90% full
: 91-100% full
: Exceeds capacity
- Active: Icons indicate whether the pen is active or inactive . See Deactivate or Reactivate PensDeactivate or Reactivate Pens to learn more.
- Click the Options button at the top right of the page, and then select Assign Pens. The Assign Pens window opens.
- Select one or more pens to assign for the zone in Pens. Multiple pens can be selected.
Click the Options button at the top right of the page, and then select Edit Zone. The Edit Zone window opens. Follow the guidelines below when editing zones:
- The name entered must be unique and cannot match the name of existing zones.
- The Premise ID is an optional identifier for the pen's assigned zone.
- The Herd Code is a required identifier for the zone's herd.
- If you have more than one Zone Type, the type can be set to Primary or Secondary.