Harvest Management
The Harvest Management feature allows you to manage all of your dairy's harvests. Each new harvest is created in the WeighComp app, and data for each harvest load is captured on the app by a scale attendant. The harvest can then be viewed and managed in PULSE.
You can find this feature under the WeighComp menuWeighComp menu.
The relationship between WeighComp, FeedWatch (on-premise), and PULSE for harvest management is shown in the following diagram.
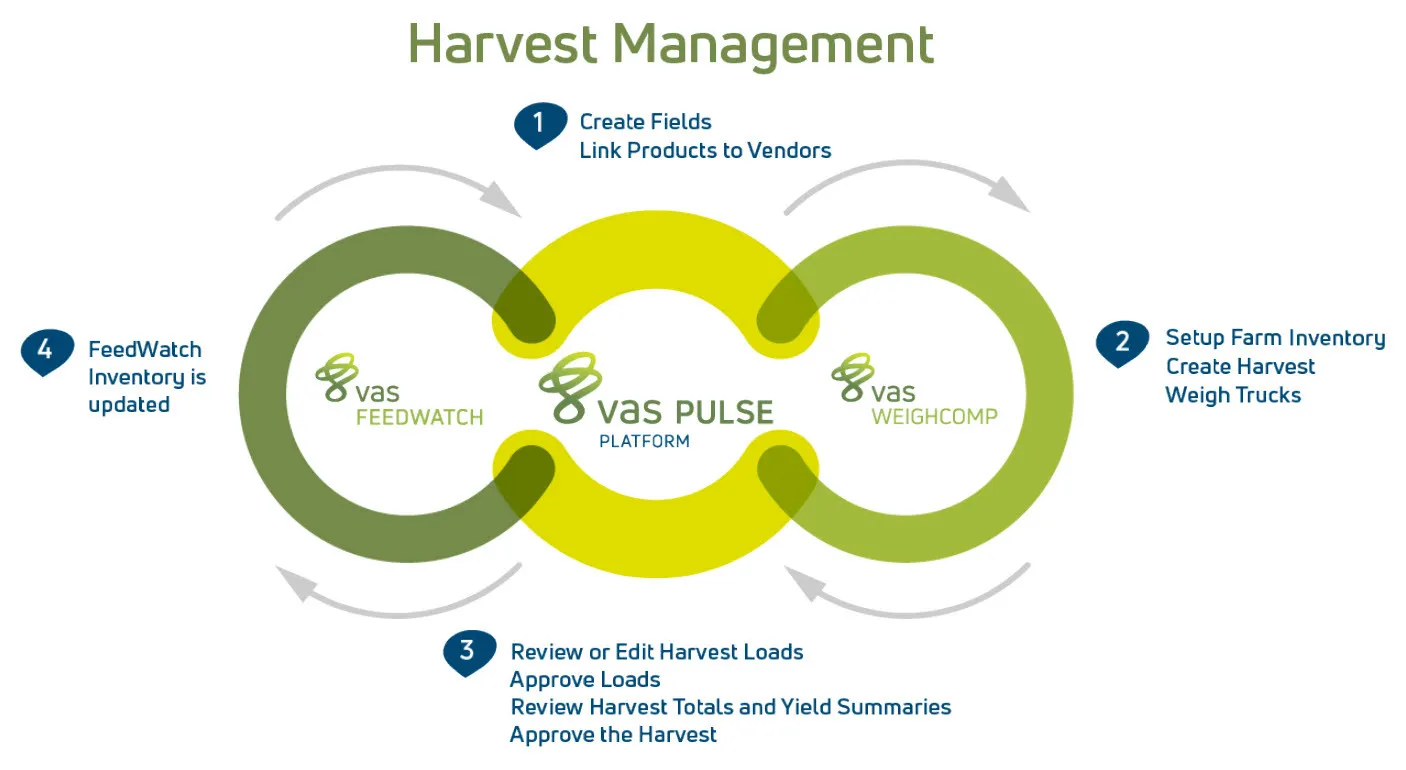
See the topics below when managing your harvest data:
The harvest data displayed in PULSE originates in the WeighComp app. The WeighComp app is used by the harvest attendant whenever a harvest is underway. The attendant creates the harvest in the app and then uses the app to enter data for each harvest load. Attendants can switch between harvests, or can exit out of harvest mode completely to use the app for spot load WeighComp transactions (i.e., non-harvest transactions). Once a harvest is done, the attendant marks it as complete in the app.
Load data is sent to PULSE in real time. Marking the harvest as complete in the app allows PULSE user to know that no more loads will be entered for the harvest. The user can then complete the review of the harvest and approve it in PULSE.
To enter Harvest Management mode, click the Harvest button on the main app screen.
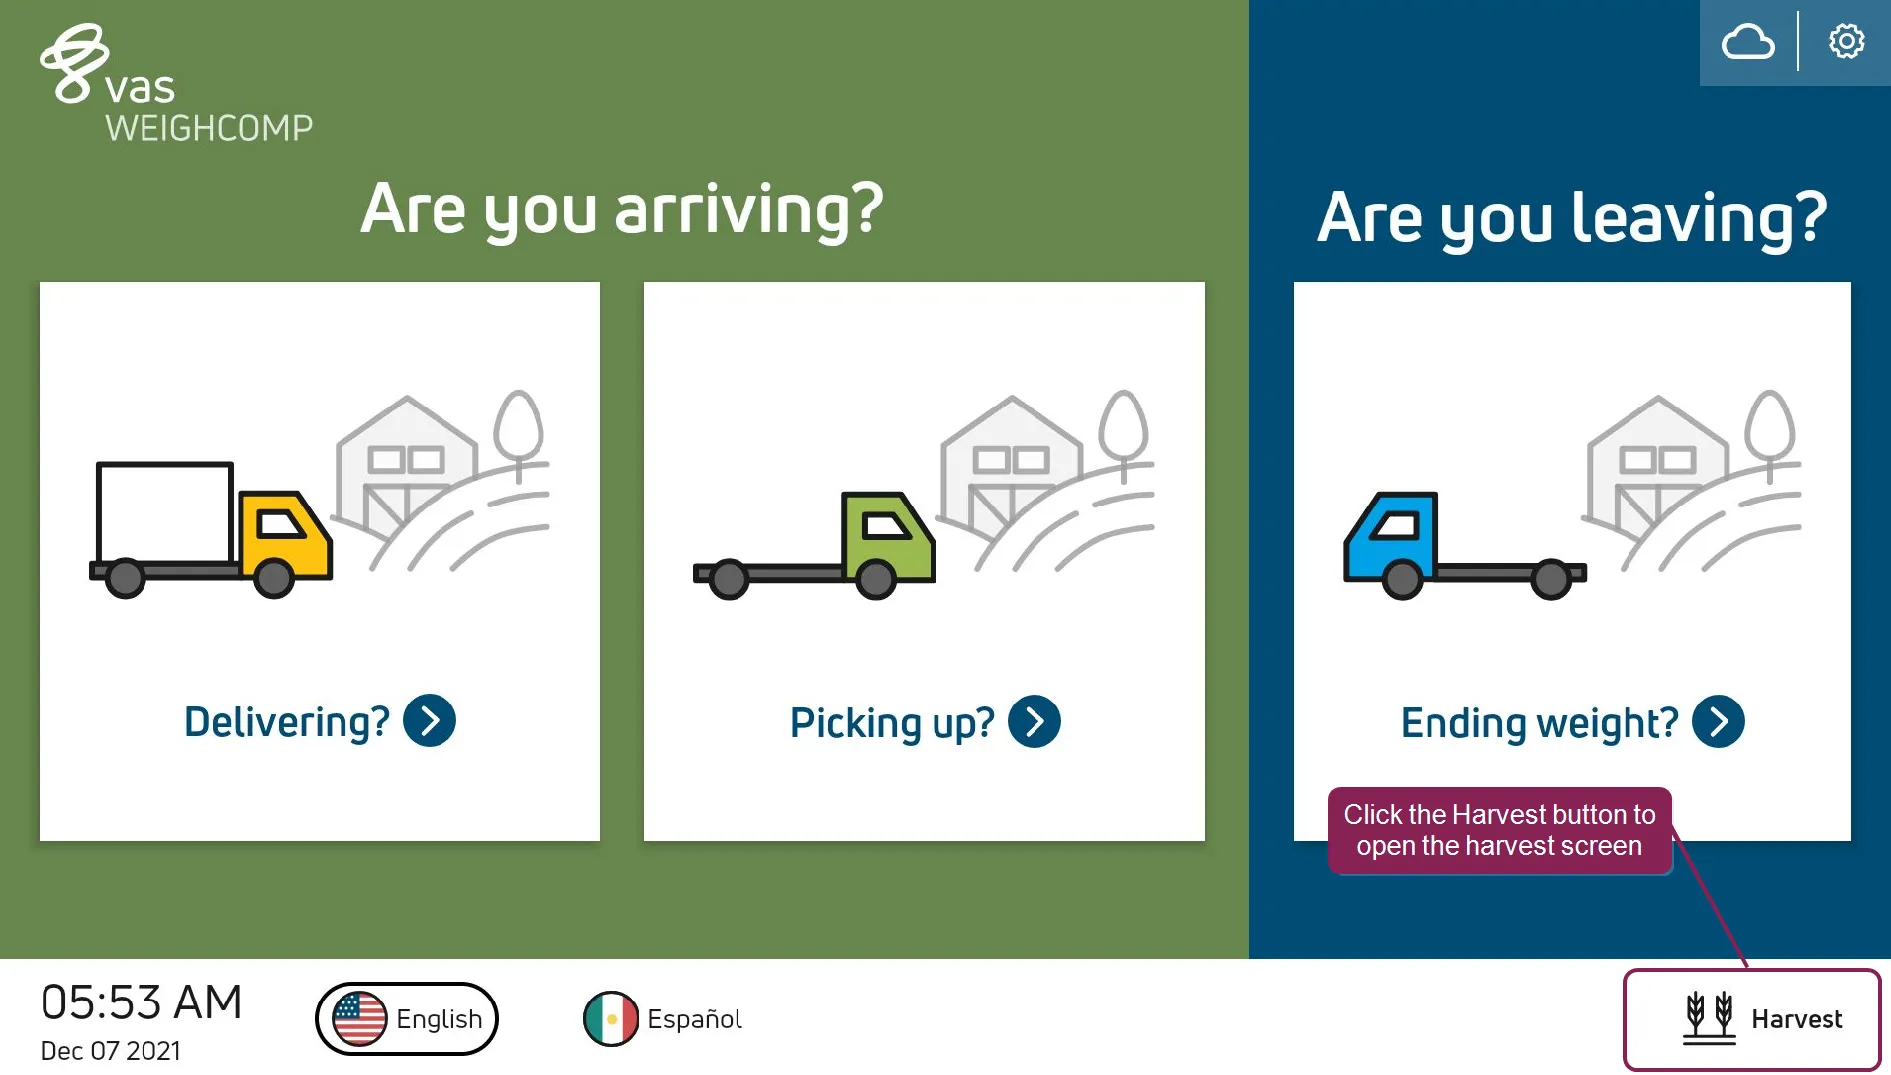
The system will display the harvest screen.
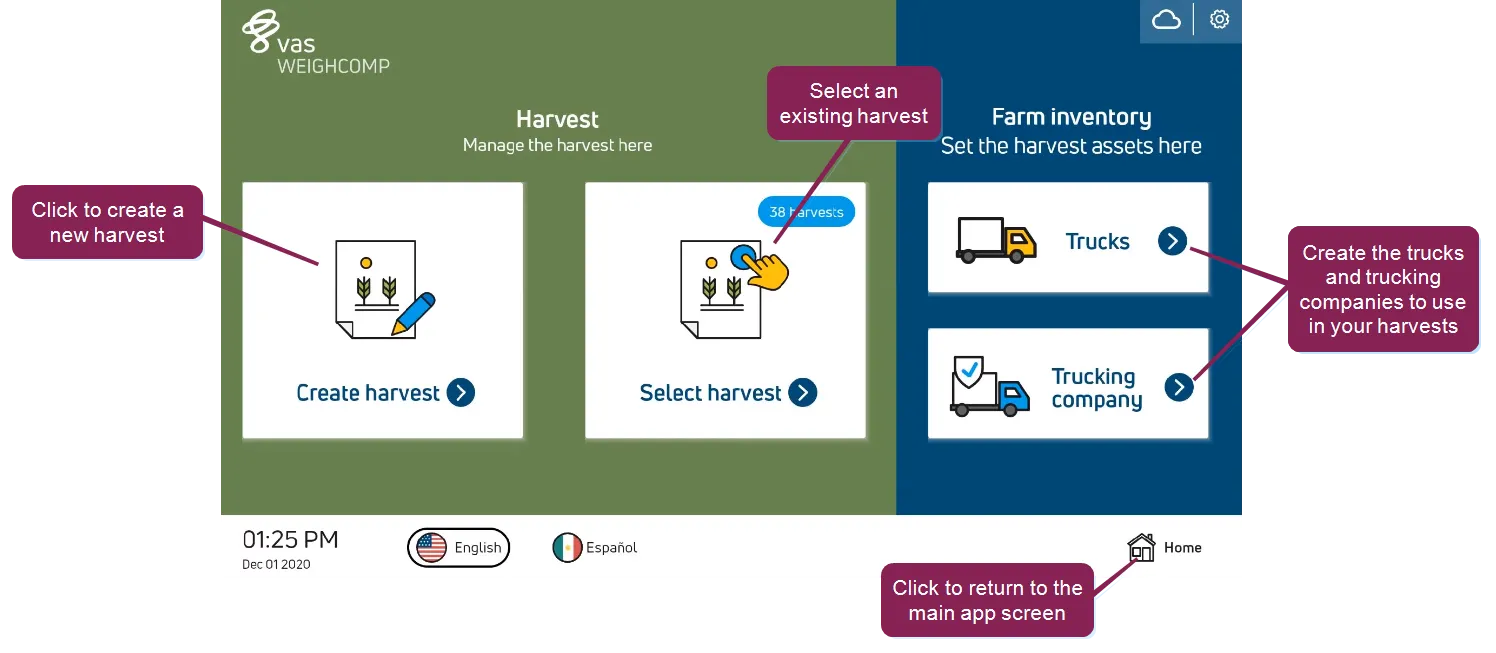
There are four steps involved when using the app for harvest management:
Setting your farm inventory means creating the assets (i.e., the trucks and trucking companies) you'll be using in all of your harvests. To view your trucks, for example, click the Trucks button. To add a new truck, click Add new.
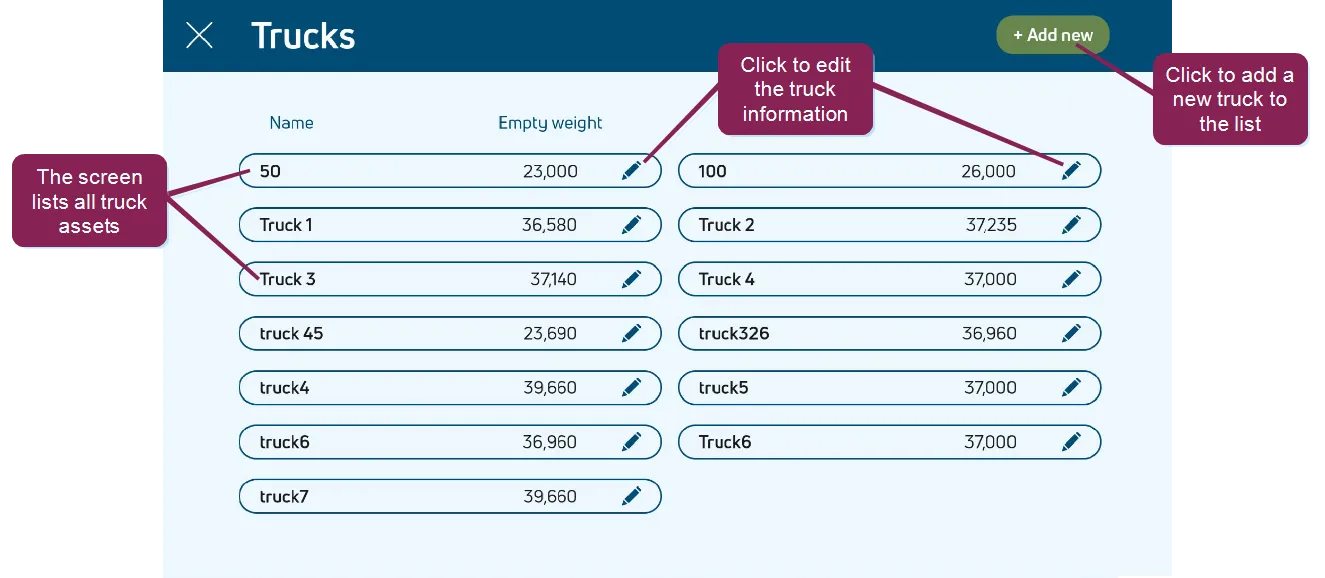
NOTE: Adding trucking companies in addition to adding trucks is helpful in differentiating between trucks with the same name or number from different companies.
Once you have set your farm assets, you can start to create harvests. When you create a new harvest, you'll be asked to give it a name.
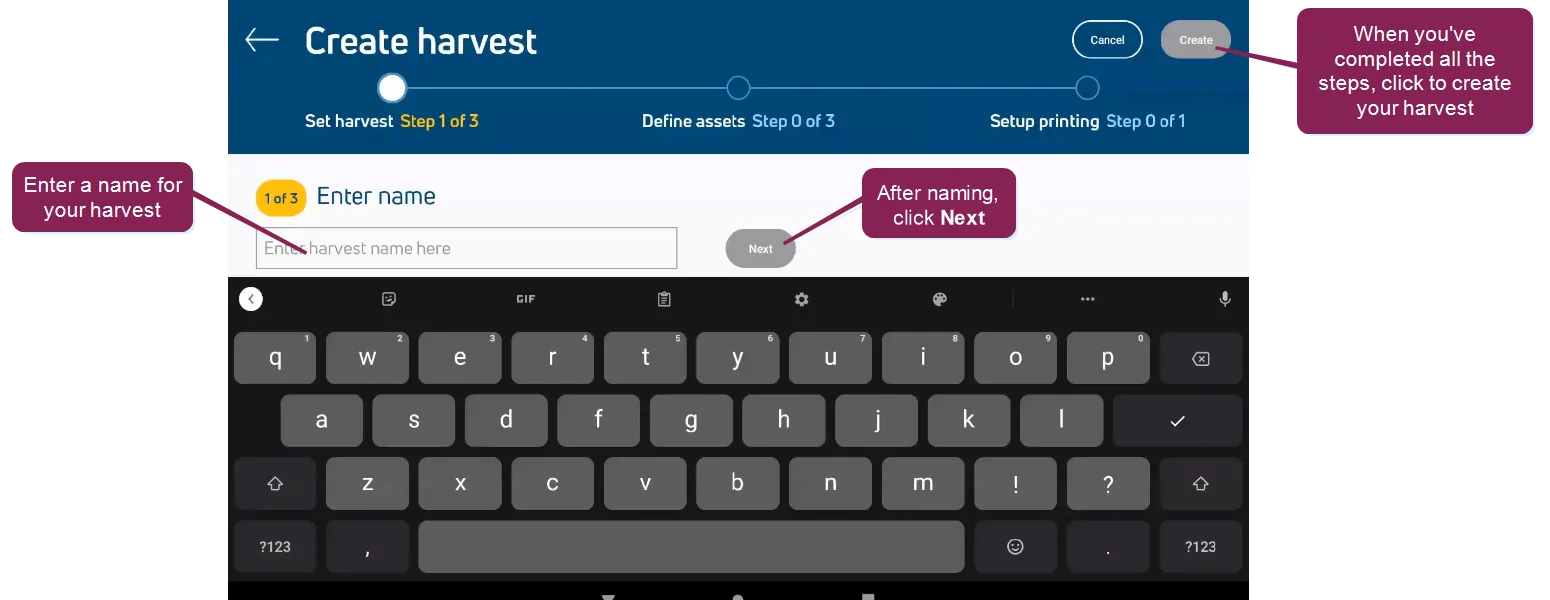
After you've named the harvest, you'll be prompted to choose the vendor and product for the harvest. You'll then be asked to assign the assets for the harvest (i.e., fields, trucks, and location) and set up the harvest's printing parameters.
Once you've entered all of the required information, click Create.
Harvests that you've created can be viewed in your harvest list by clicking Select harvest.
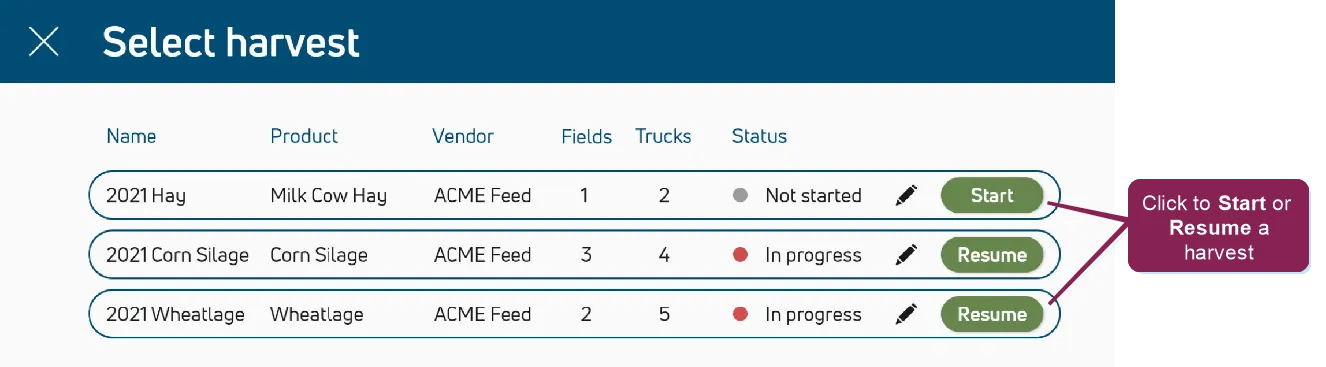
From here you can start entering data for the loads as they arrive. You'll be prompted to enter weights, field, and location information for the load.
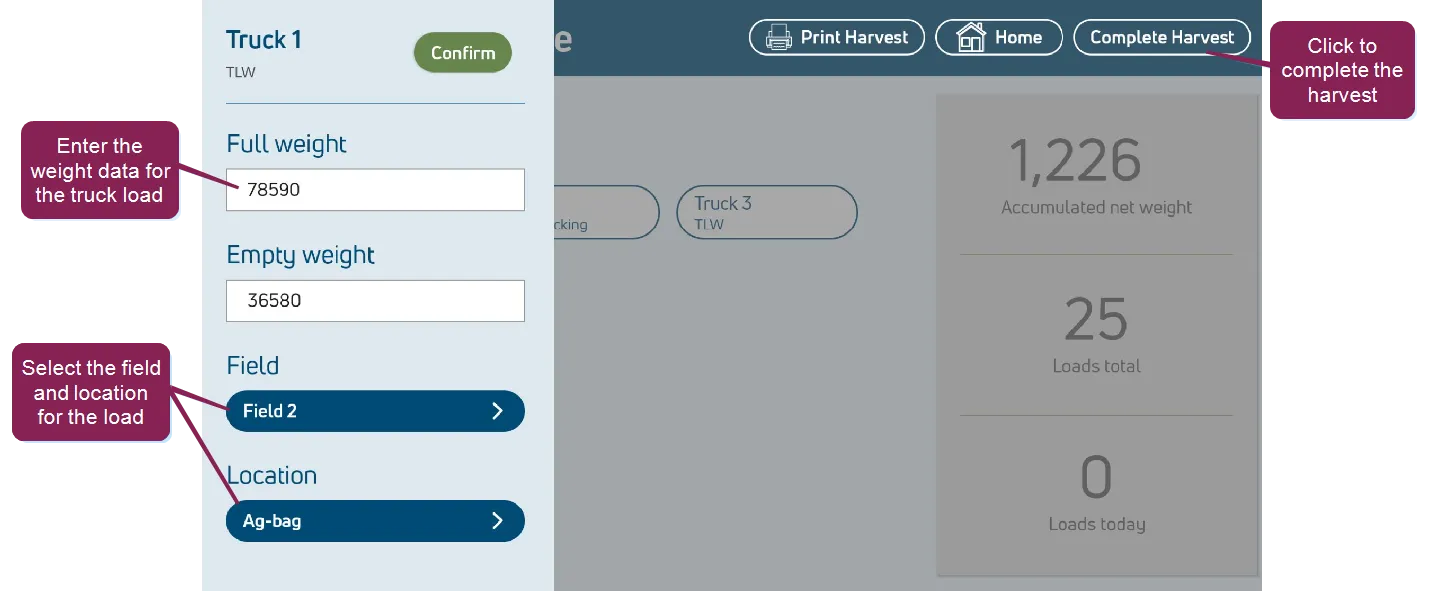
Remember that you can pause a harvest at any time to work on a different harvest or go back to the main WeighComp Home screen. You can resume the harvest at a later time from the harvest list.
The Harvest Management page displays a list of every harvest conducted within WeighComp. All of the information shown in the list is provided by the WeighComp app after a harvest has been started in the app and the transactions for the harvest have begun.
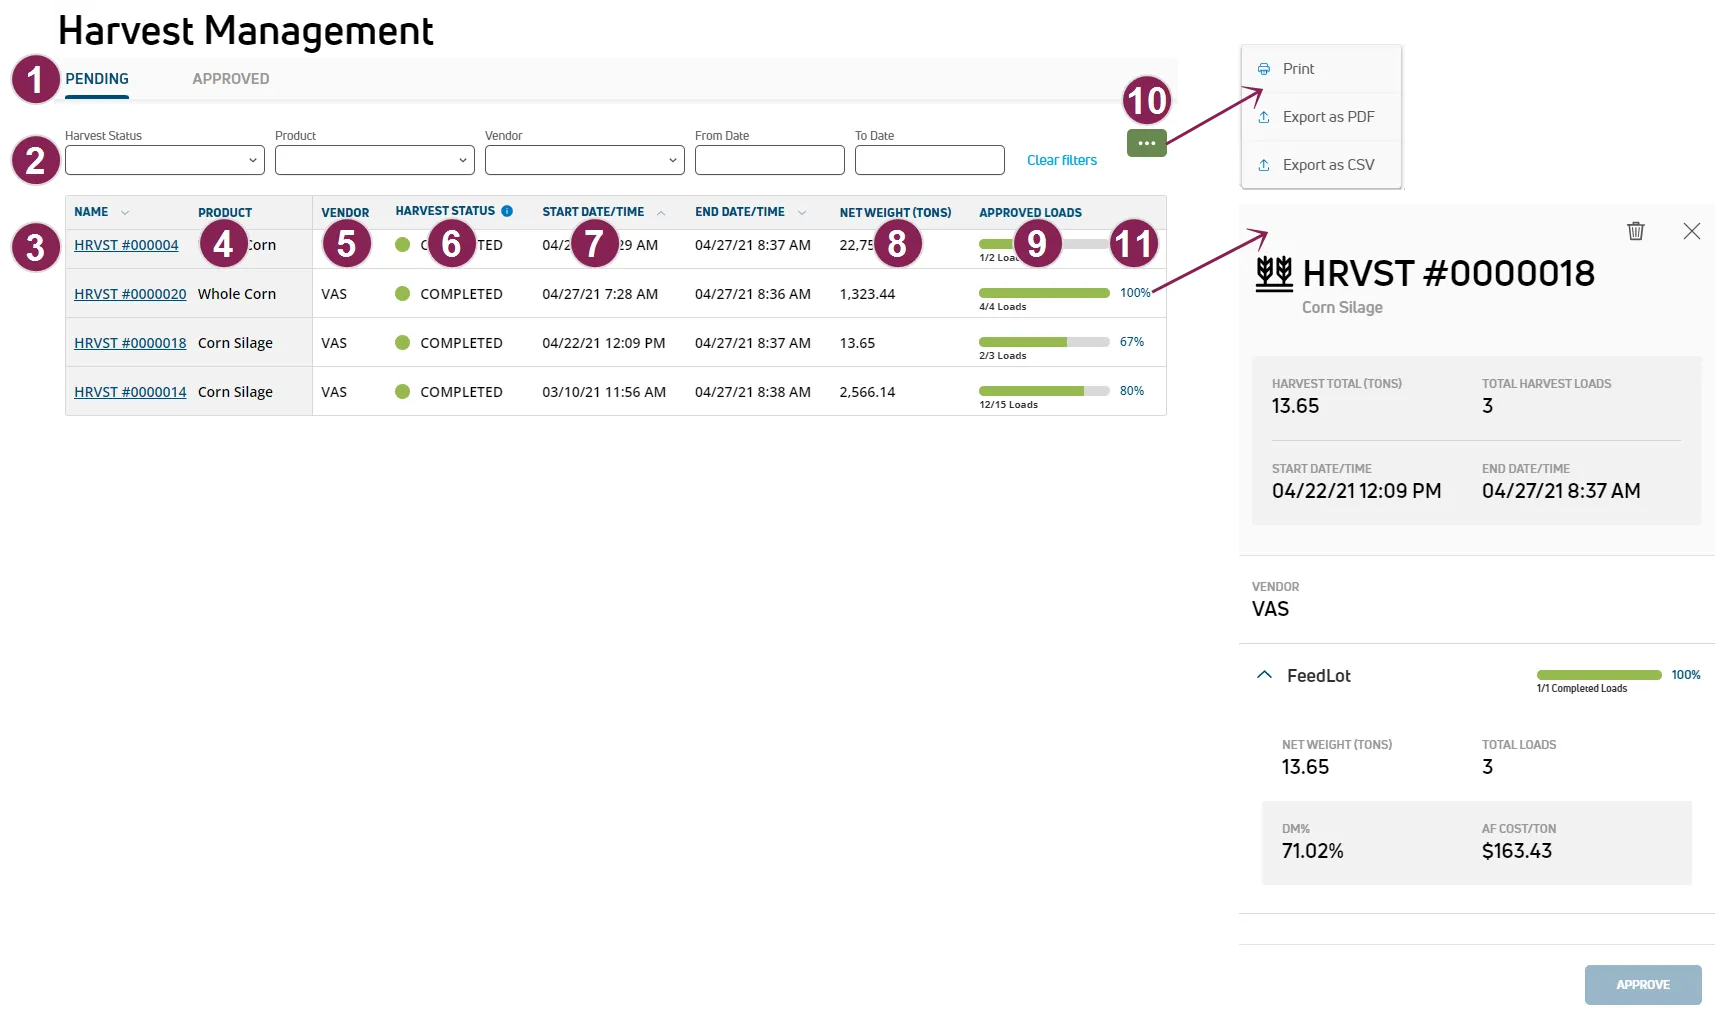
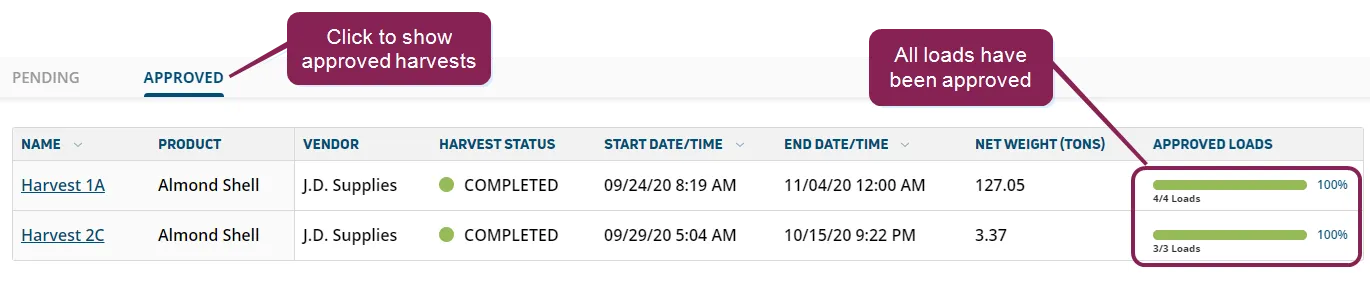
Pending/Approved: Click the Pending or Approved tab to choose either type of harvests to display.
- Pending harvests are those in which the loads have been completed but have not yet been reviewed and approved.
- Approved harvests are those in which all loads have been completed, reviewed, and accepted.
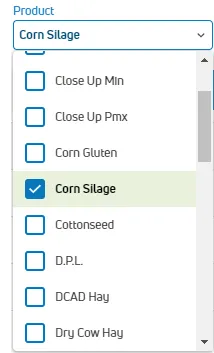
Display filters: Filter the list by Type, Vendor, Product, etc.
Name: Displays the name given to the harvest when it was created in the WeighComp app. Click on the harvest name to view its individual loads.
Product: The type of product associated with the harvest (e.g., corn silage, hay, etc.).
Vendor: The name of the vendor (from FeedWatch (on-premise)) associated with the harvest.
Harvest Status: A color-coded indicator of the harvest's present status.

Harvest totals cannot be approved until the harvest is completed in the WeighComp app.
Start/End Date/Time: The date and time that the harvest began and ended.
Net Weight (Tons): The current total weight of the harvest, whether it's completed or still in progress.
Approved Loads: Provides a quick visual indication of the total number of loads for the harvest, how many loads have been approved, and the percentage of approved loads.
Options button: Click the Options button  at the top right of the page to print or export your transaction data for further analysis or for record keeping purposes. See Print and Export WeighComp DataPrint and Export WeighComp Data to learn more.
Harvest Details side panel: Click anywhere on a harvest row to view harvest details in a side panel. See Approve or Delete HarvestsApprove or Delete Harvests to learn more.
NOTE: If you click on a harvest name, the Harvest LoadsHarvest Loads page opens instead of the side panel.
If a harvest has multiple locations, click on the name of the harvest in the main list. Instead of displaying the harvest overview page, a side panel displays containing separate load information about each location.
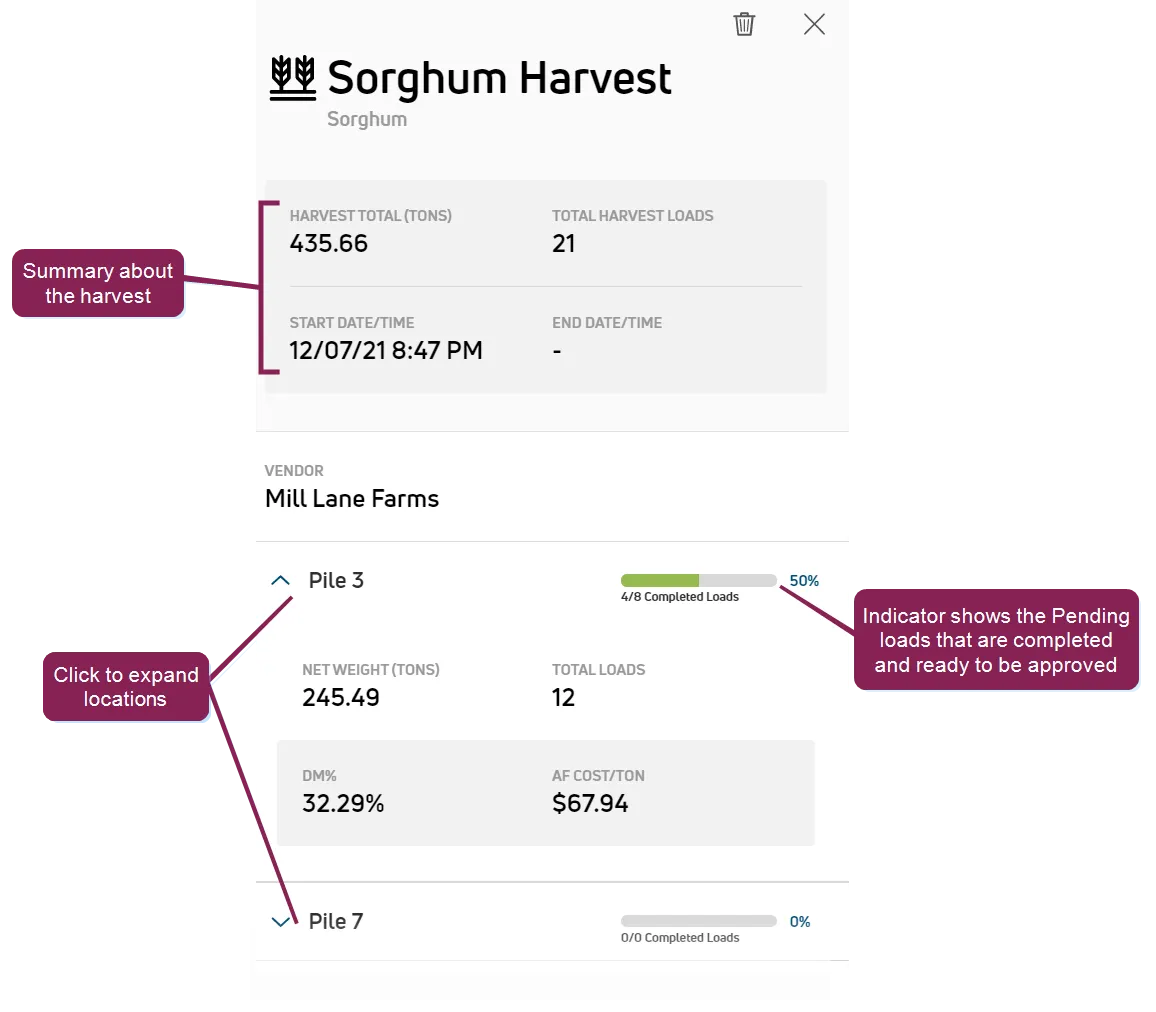
Each location contains an indicator with the total number of loads for that location, as well as the number/percentage of completed loads. Completed loads are pending loads that have all of the information required for approval, such as Location, DM%, Cost, etc. To view more details for the location, click the blue arrow  to expand it.
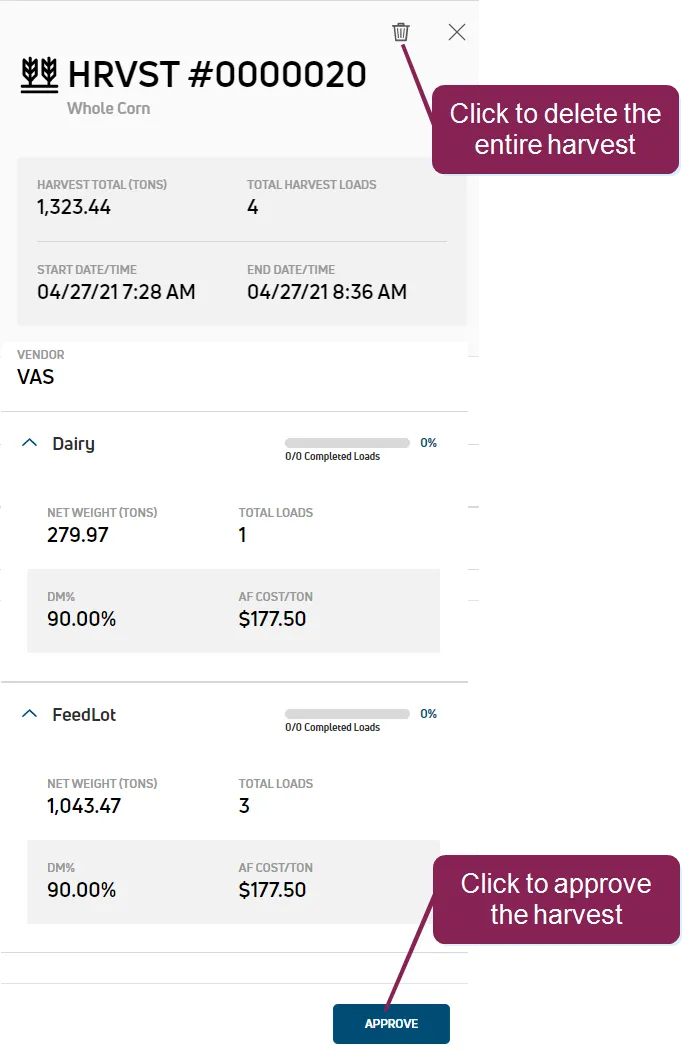
Click on any pending harvest to open its side panel, where you can approve or delete the harvest.
Follow the guidelines below when you work with harvests:
- To approve the harvest (and remove it from the Pending Harvest tab), click Approve. Approved harvests are considered done and cannot be deleted.
- To delete a pending harvest from the side panel, click the Delete icon
 in the upper right corner. If you delete a pending harvest, all of the associated harvest loads will also be deleted.
See a summary of your harvest, plus a list of its pending loads, by clicking on the name of the harvest in the main list.
The Overview tab provides a snapshot yield summary for the harvest. Click on a sub-tab to view yield data by truck, field, day, or location.
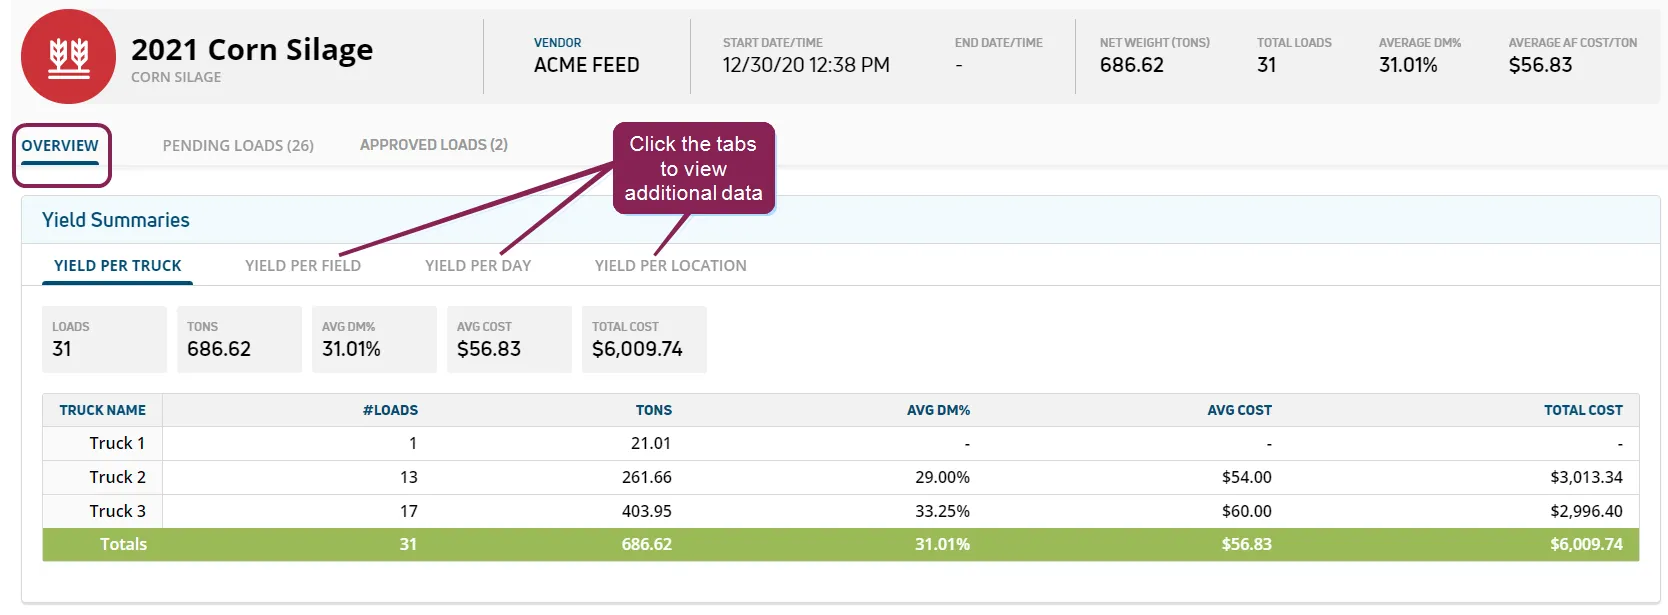
The Pending Loads and the Approved Loads tab also provide detailed information about each load.
NOTE: The harvest details page is used only for harvests with single locations. For harvests with more than one location, see View Harvests with Multiple LocationsView Harvests with Multiple Locations.
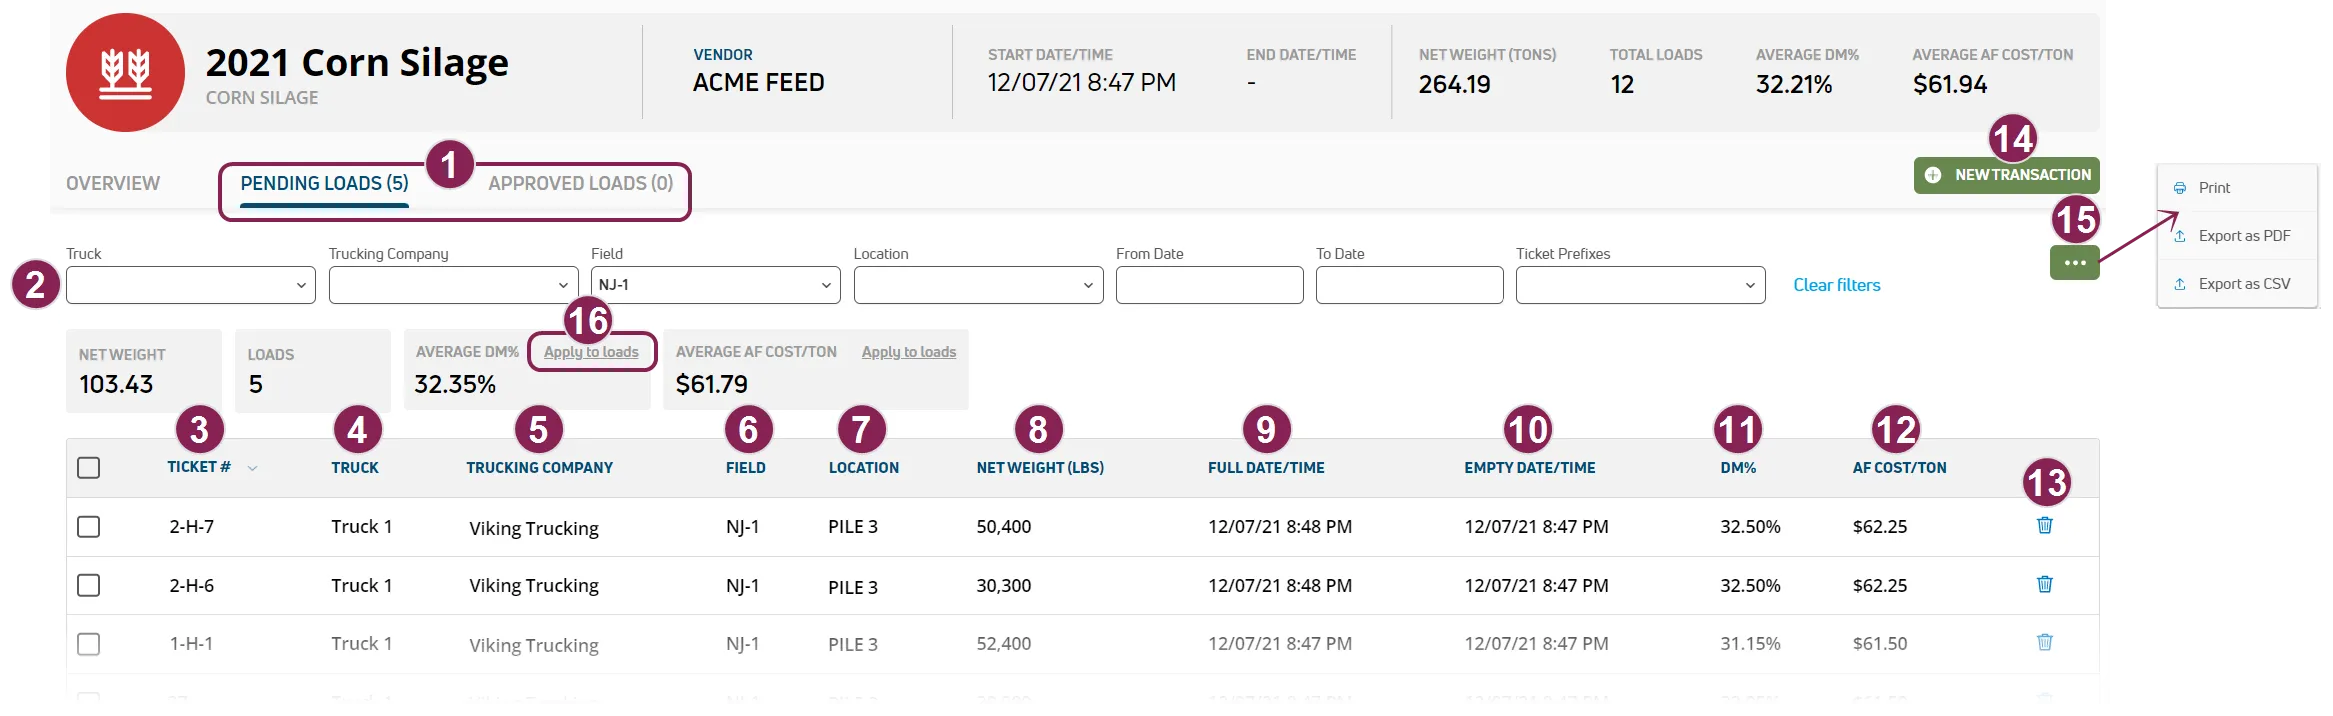
Pending/Approved: Click the Pending or Approved tab to choose either type of harvest loads to display.
- Pending Loads tab provides detailed information about each load that has not yet been approved
- Approved Loads tab provides detailed information about each approved load
Display filters: Filter the list by Type, Vendor, Product, etc.
Ticket #: The ticket number that was generated in the WeighComp app when the load was completed or manually created in PULSE. The system automatically assigns a new ticket number to the transaction using the following structure:
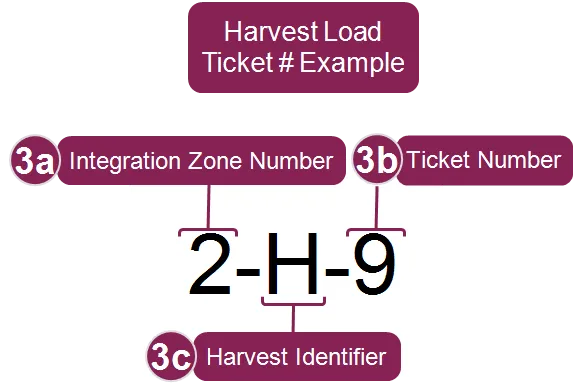
3a. Integration Zone Number: The identifier for the WeighComp tablet that was used to create the ticket.
3b. Ticket Number: The unique, sequential number that the WeighComp app generates every time you create a new ticket. When a harvest ends and a new harvest begins, the WeighComp app will still assign the next sequential ticket number to the next harvest transaction. For example, if the last ticket number in your last harvest was 2-H-5, the first ticket number in your next harvest will be 2-H-6.
3c. Harvest Identifier: Indicates that the ticket refers to a harvest transaction, not a spot load transaction.
Truck: The name of the truck that delivered the load.
Trucking Company: The company of the truck that delivered the load.
Field: The field where the load was harvested.
Location: The physical location on the farm where the load was delivered.
Net Weight: The weight of the product delivered.
Full Date/Time: The date and time that the fully loaded truck was weighed.
Empty Date/Time: The date and time that the emptied truck was weighed.
DM%: The percentage of dry matter for the load.
AF Cost/Ton: The cost of the product.
Delete icon: Click the delete icon  to delete the load. See Edit and Approve LoadsEdit and Approve Loads to learn more.
New Transaction: Click the New Transaction button  at the upper right corner of the Pending Loads screen to add a new transaction to your records directly from PULSE. See Add a New LoadAdd a New Load to learn more.
Options button: Click the Options button at the top right of the page to print or export your transaction data for further analysis or for record keeping purposes. See Print and Export WeighComp DataPrint and Export WeighComp Data to learn more.
Apply to loads: Click Apply to loads next to the Average DM% or Average AF Cost/Ton value to apply the value to all the tickets in the Pending Loads list. After you apply the new value, refresh the page to see the updated tickets.
You can easily add a new harvest load to your records on PULSE. In the Pending Loads tab, click the New Transaction button at the upper right corner of the screen to open a side panel where you can create a new load.
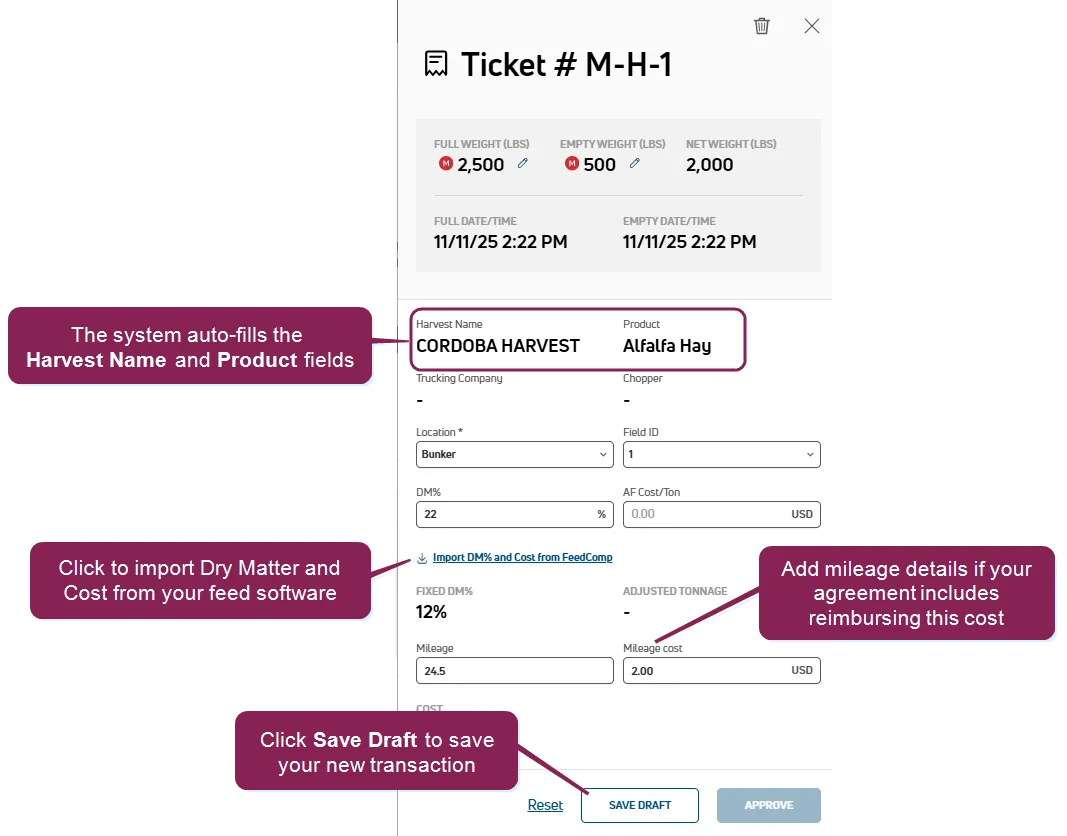
Follow the guidelines below when you add new harvest loads:
- You can manually enter a ticket number for the transaction. If you prefer, you can leave the ticket number blank.
- The fields in this side panel are the same as those shown in the Pending Loads list. Refer to View Harvest LoadsView Harvest Loads for a description for each of these fields.
- Note that the system automatically fills in the Harvest Name and Product fields.
- You can manually enter information for the DM% or AF Cost/Ton fields or you can click Import DM% and Cost from FeedWatch or FeedComp to directly import the percentage of dry matter or the cost of the product from FeedWatch. See Import Dry Matter and Cost DataImport Dry Matter and Cost Data to learn more.
- If your transaction includes mileage costs, you can add those details when adding the load.
When you're finished, click Save Draft. The system displays a message at the bottom of the page stating that your new transaction has been added.
The list now displays your new load, which you can now edit or approve. See Edit and Approve LoadsEdit and Approve Loads to learn more.
Click on any pending load to edit its details in a side panel.
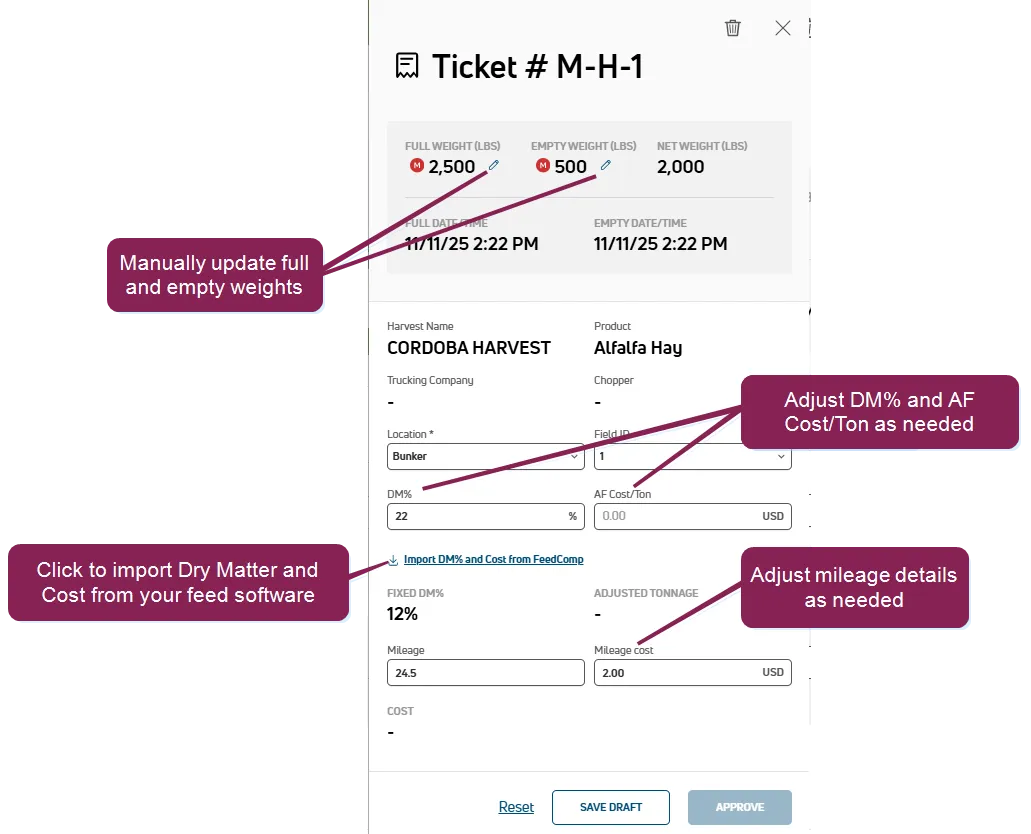
Follow the guidelines below when you work with harvest loads:
- To delete a pending load, click the Delete icon in the upper right corner.
- When editing a pending load, you can use the Save Draft button to save your changes before actually approving the load.
- To approve the load (and remove it from the Pending Loads tab), click Approve.
NOTE: Pending loads cannot be approved without values for dry matter and cost data.
The full and empty weights originally received by the WeighComp app for pending loads can be manually edited:
- Click on a pending load to display its side panel.
- In the side panel, click the edit icon
 for the full weight or empty weight.
- Enter a new full or empty weight value.
- When you're finished editing the information, click Save Draft
You can edit/update multiple pending loads at the same time, provided that they all have the same product (for example, Corn Silage). Remember, you can filter the transaction list using the Product filter at the top of the list.
To update multiple transactions:
- Check the boxes for the loads you want to update. You can check boxes for individual loads, or check the topmost box to select all loads. A blue indicator bar appears near the top of the grid showing the number of transactions selected as well as an edit icon.
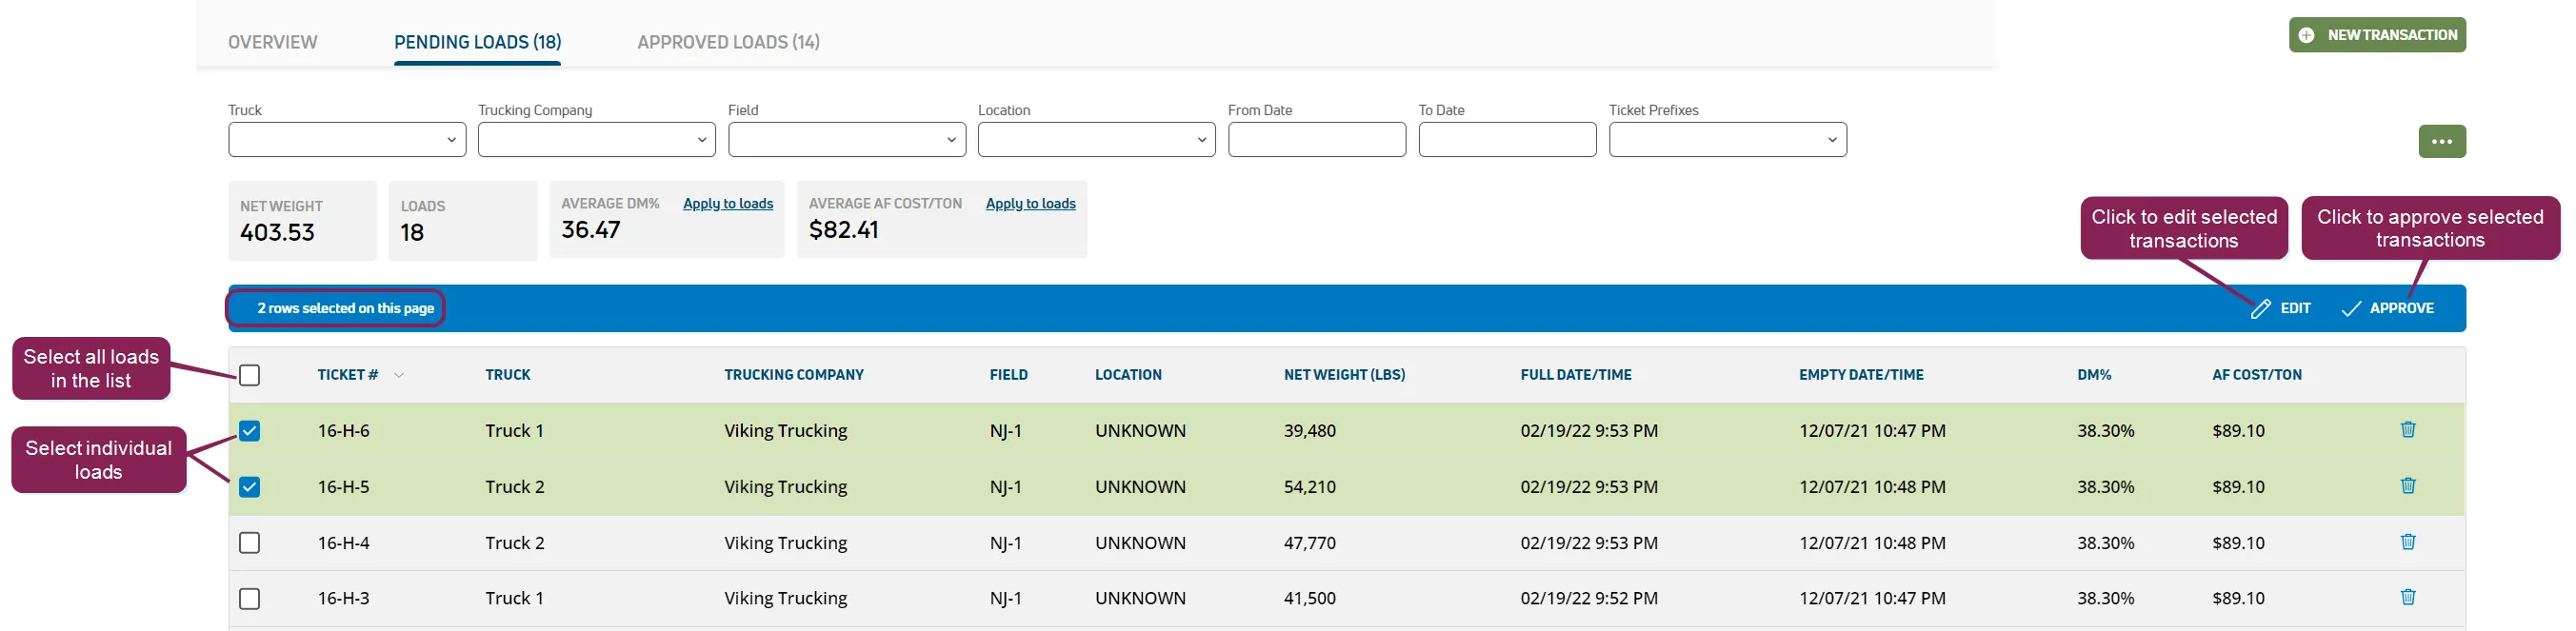
- Click the edit icon
 to open a window where you can update the pending loads information.
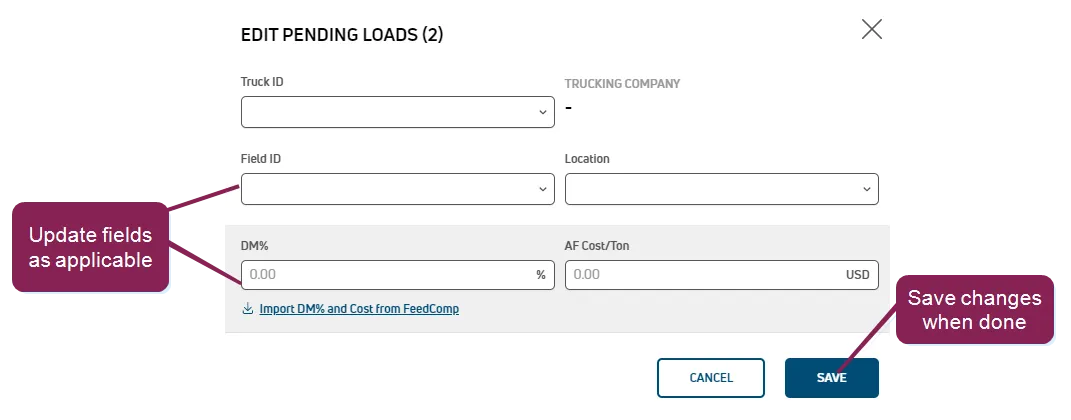
- Edit the applicable fields as desired, then click Save. A green indicator bar appears at the bottom of the screen stating how many loads have been updated, and the data for the applicable loads updates in the loads list.
TIP: Amounts are displayed in pounds or kilograms based on the unit of measure specified for your user accountuser account.