Vetcodes
All users assigned to a role with Herd Read permissions can view this feature. Only users who are assigned a role with Herd Configuration permissions can edit data or customize settings.
See the topics below to learn more:
- Know Your VAS PULSE VersionKnow Your VAS PULSE Version
- Edit Dairy User PermissionsEdit Dairy User Permissions
- Manage Dairy RolesManage Dairy Roles
PULSE uses vetcodes to determine which animals need to be vet checked. You can adjust each code's settings to control when animals are flagged for a check and added to a vet list for evaluation by your veterinarian. Each vetcode has a specific use and pre-defined settings to match industry standards and best practices. You can find this feature under the DairyComp/MyDC menuDairyComp/MyDC menu > SettingsSettings option on the Health Settings tab.
If necessary, you can adjust the settings to meet your dairy's specific needs. This page also allows you to set event shortcuts for processing vet lists in the mobile app.
Expand the sections below to learn more:
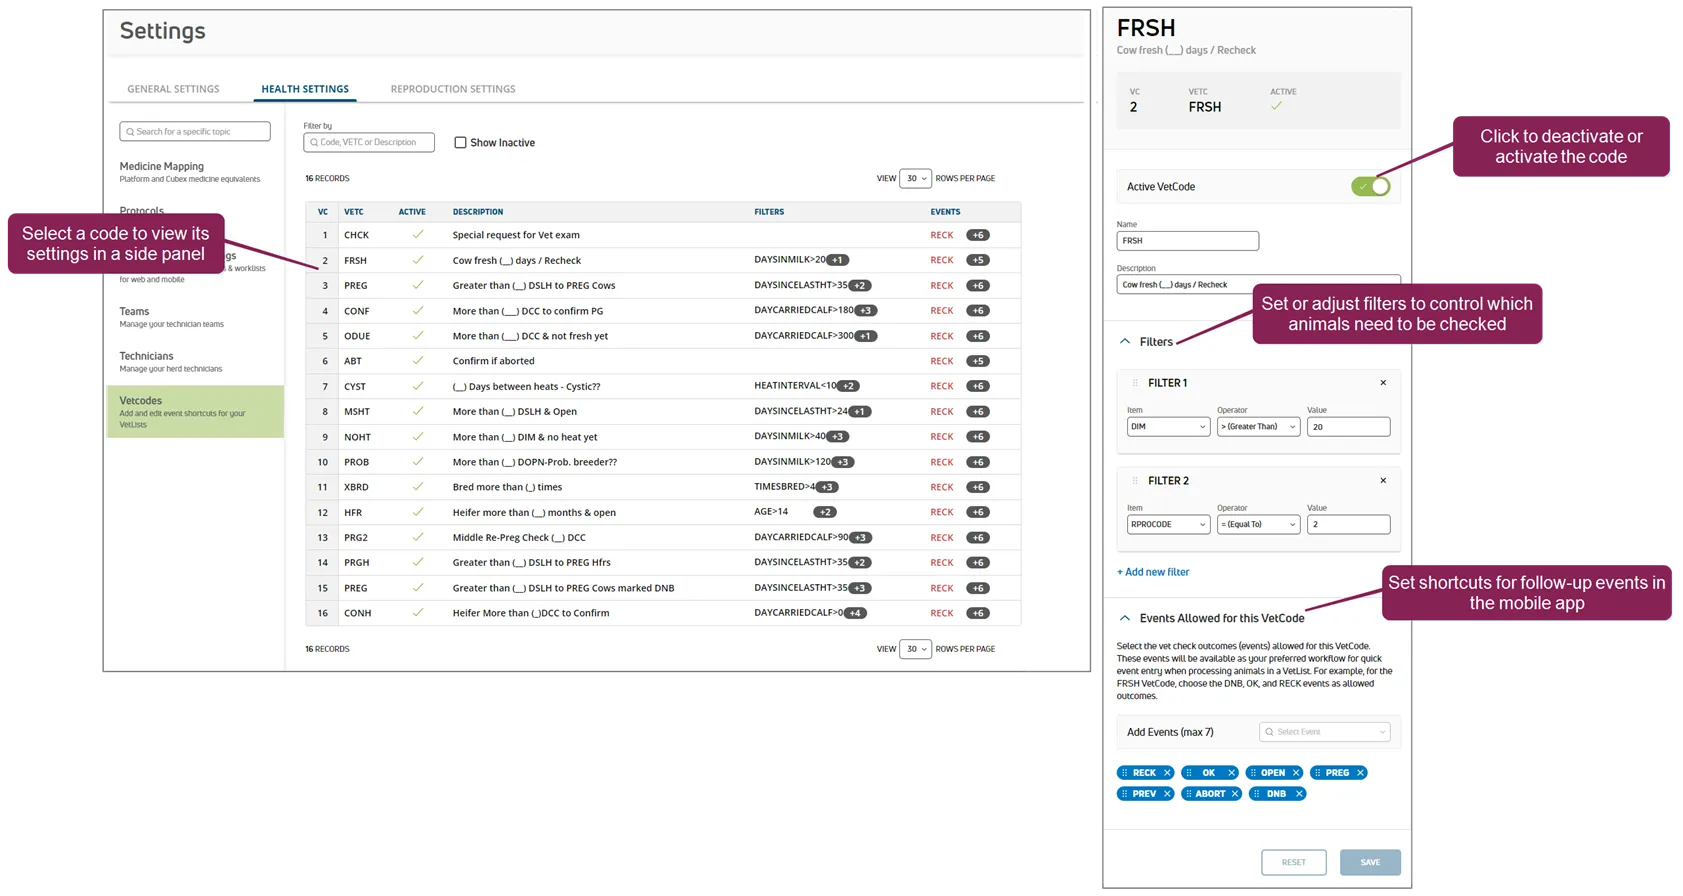
As shown in the example above, the vetcode settings page lists all vetcodes and the corresponding filters set to add animals to your vet list. The following information is displayed for each vetcode on the page and in a side panel if clicked:
- VC: Numeric vetcode from DC305.
- VETC: The abbreviated reason for the vet check. See Vetcodes for more details on the standard set of DairyComp vetcodes.
- Active: Check the Show Inactive box at the top of the page to view all available vetcodes in the list. Icons indicate whether the vetcode is active
or inactive
. Once text is typed, click the Clear Filter(s) option to the right of the field to clear the text typed..
- Description: A brief description of the code. See Vetcodes for a more detailed description of each code.
- Filters: The filters listed in this column define the conditions under which PULSE will assign the corresponding vetcode to an animal. If an animal meets all of the conditions specified in the related filters, that animal will be added under that vetcode to the vet list. If you see a plus sign and a number to the right of the filter, it indicates that this code has more than one filter. Click the indicator to view the additional filters:
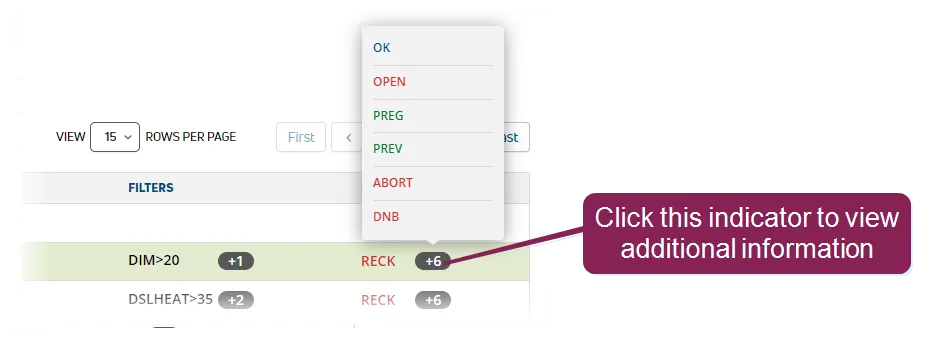
- Events: This column shows which event shortcuts have been added to each vet check. The shortcuts are displayed in the same order they are assigned to the vetcode; click the plus sign to the right of the first event name to view the remaining event shortcuts.
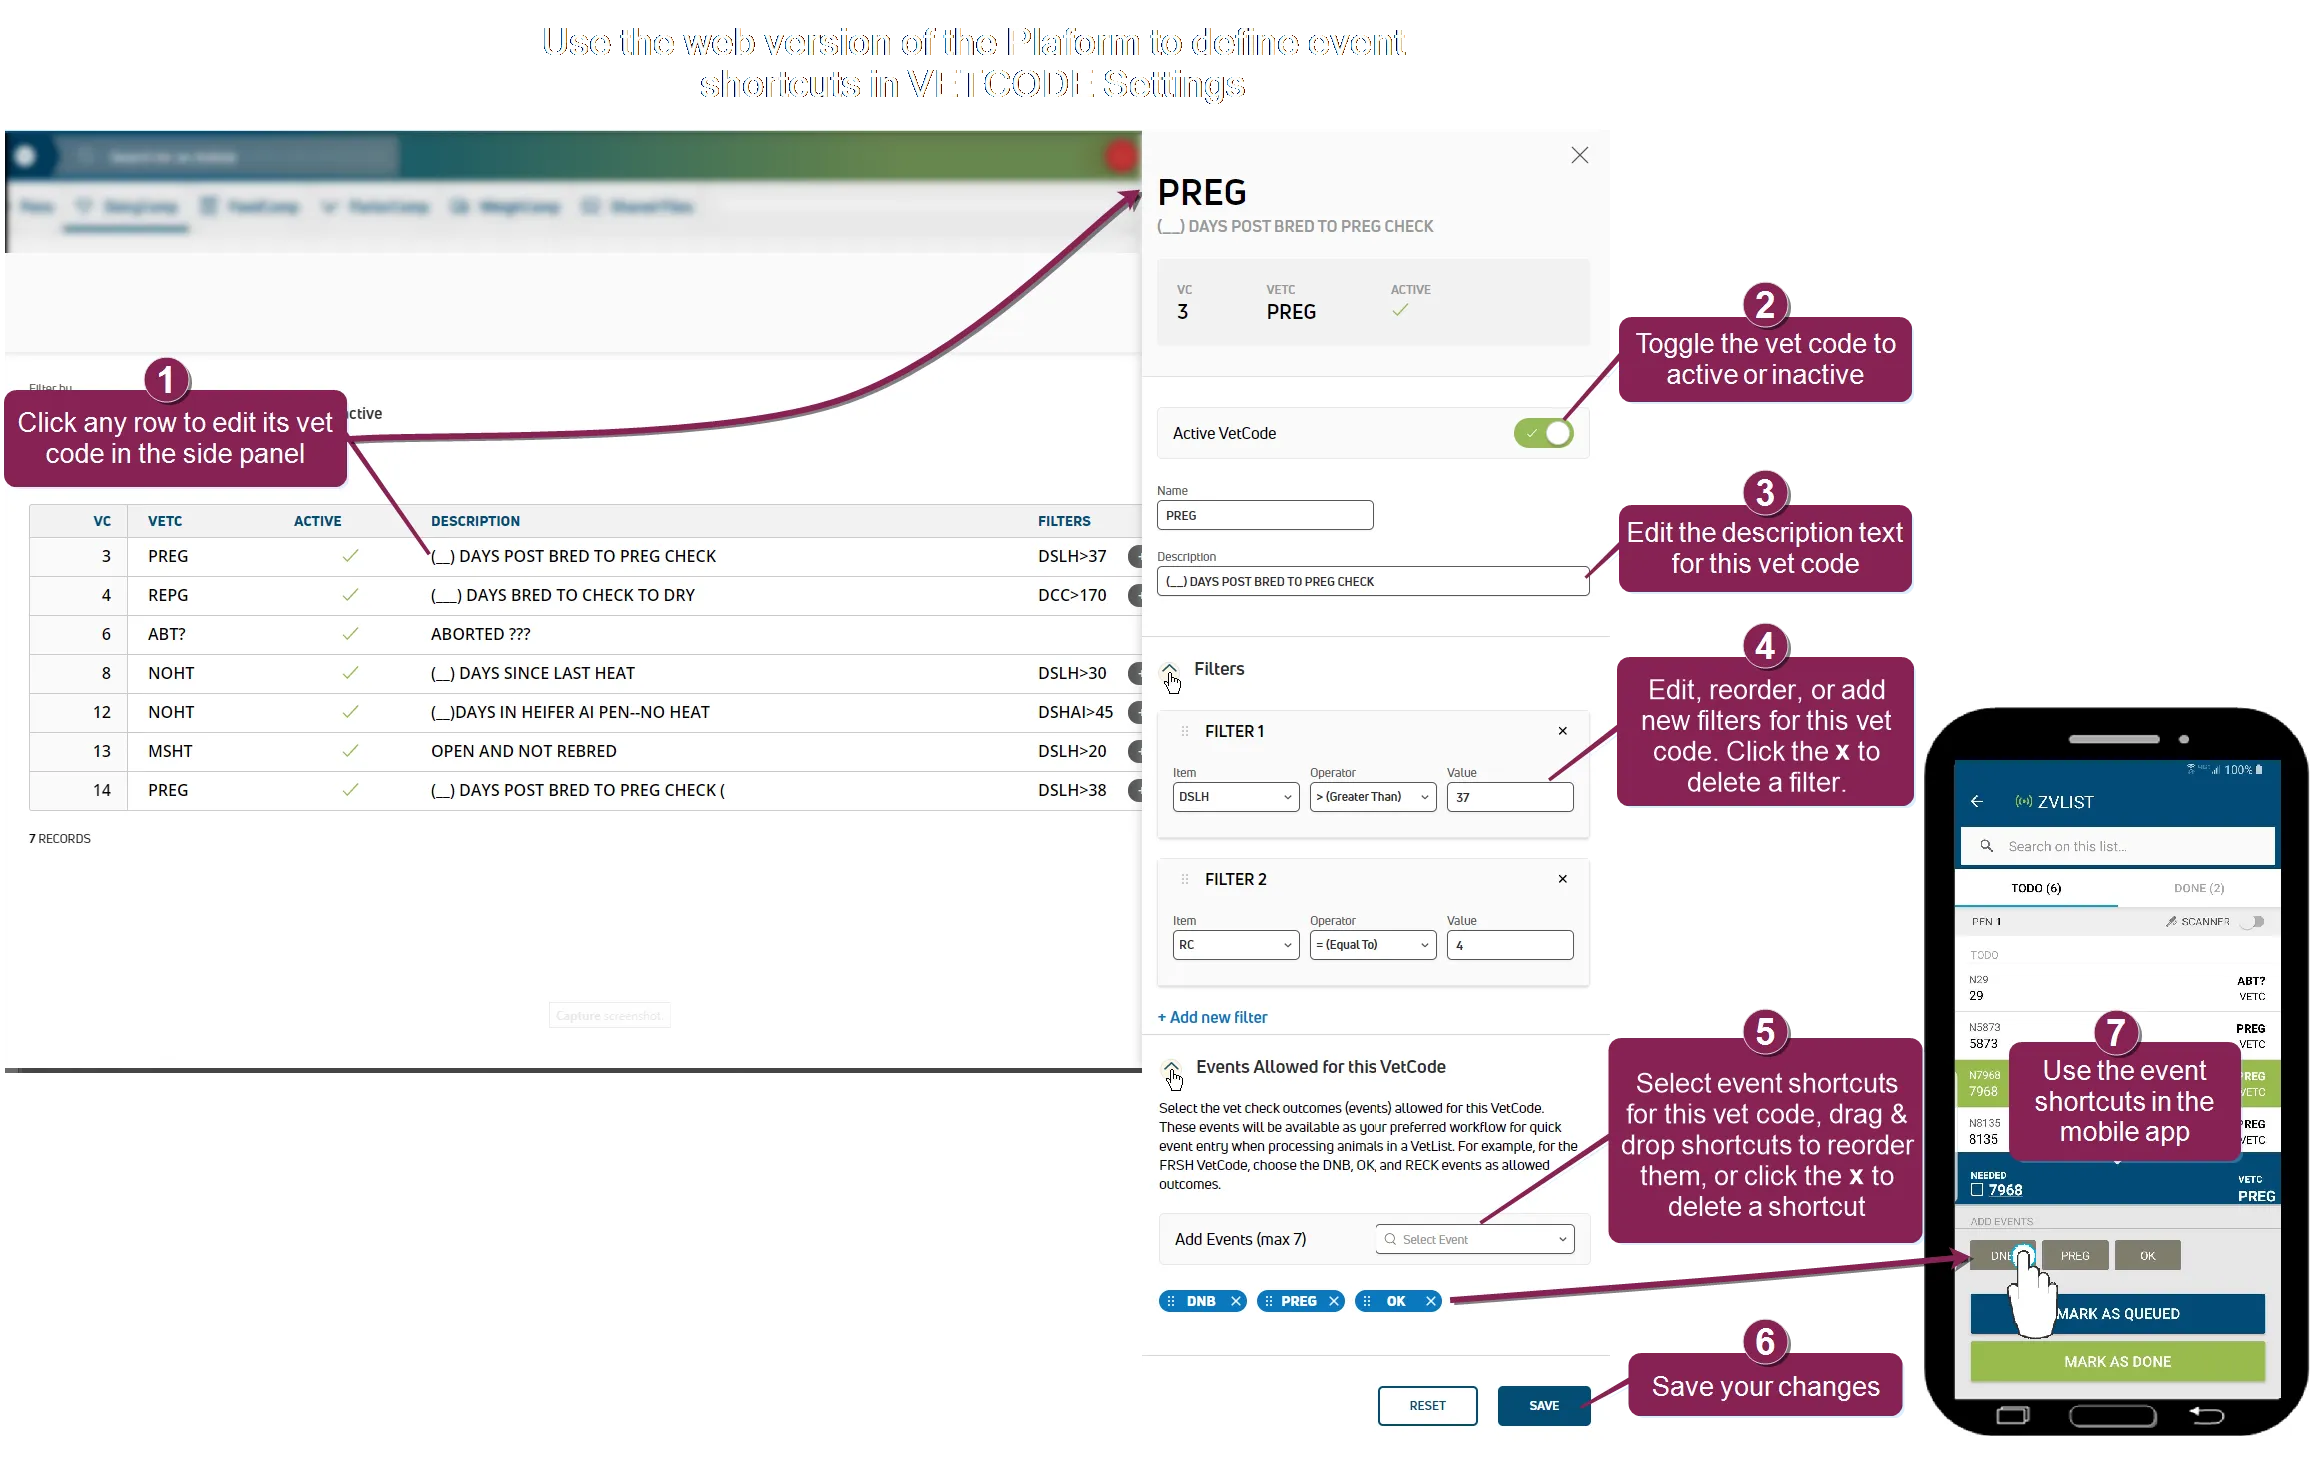
Follow the steps below to edit a vetcode, including its filters and which event shortcuts are available in vet lists in the mobile app.

Click any row to open its vetcode for editing in a side panel. As illustrated above, the side panel displays the same data as each column in the table, and it includes a section to select event shortcuts.
Click the Active Vetcode toggle to make the vetcode active or inactive.
Click the Description field to change the text description of the vetcode. This field is optional.
Click the Filters drop‑down list in the side panel to manage the filters for the vetcode:
- Edit the Item, Operator, and Value fields to control the application of the filter.
- Drag and drop filters to reorder them (by clicking the dots to the left of the filter name), or click the x on a filter to delete it from the vetcode.
- Click Add new filter to add a filter to the vetcode.
Click the Events drop‑down list in the side panel, and select up to 7 common events that your vet may need to choose after examining animals under the corresponding vetcode:
- Start typing an event name in the drop-down box to locate matches.
- As you add events, they are displayed with a blue background below the drop‑down field. The mobile app will display the event shortcuts in the order you see them here.
- Drag and drop events to reorder them (be sure to click the dots to the left of the event name to grab that item), and click the x on an event if you want to delete its shortcut from the vetcode.
When you are finished editing, click the Save button. If you need to clear your edits and start again, click the Reset button.
After you save your changes, the event shortcuts will be updated in the mobile app during the next care package update (for DC Unlimited dairies) or immediately for MyDC dairies. They will then be displayed as shortcuts when processing each animal in the vet list (see example above). The app automatically provides an Other button that allows you to select another event if you do not see a shortcut for the one you need.
Vetcodes are taken directly from the veterinary code table in DairyComp for DC Unlimited dairies. MyDC dairies use standard PULSE vetcodes.
NOTE: If the vet checks for your DC Unlimited dairy have been modified, you may see different vetcode numbers, names, and filters than the examples shown below.
Expand the topics below to learn more about standard PULSE vetcodes:
The check code adds animals to the list from the CHECK event. This event is used when the dairy specifically wants an animal checked by the veterinarian at the next opportunity. This code does not include any filters by default. This code does not include any filters by default.
The fresh code is used for animals that need to be examined by the veterinarian before they start breeding. The default filter values tell PULSE to add animals with a Reproduction Code of 2 (FRESH) in the first vet check after 20 days in milk.
The pregnant code adds cows to the list for pregnancy checks. The default filter values tell PULSE to add cows with a Reproduction Code of 4 (BRED) to the first herd check after 35 days since last heat.
The pregnant - early recheck code adds cows to the list for pregnancy rechecks. The default filter values tell PULSE to add pregnant cows to the first herd check after 55 days into pregnancy.
The confirm code adds animals to the list for a final check before being dried off in preparation for calving. The default filter values tell PULSE to add animals to the first herd check after 180 days into pregnancy.
The ABT code is used for animals that may have aborted and need to be examined by the veterinarian. This code does not include any filters by default.
NOTE: If pregnant animals show signs of heat, some dairies may breed them. When this breeding is entered into PULSE, the animal remains pregnant, but the abort flag instructs the veterinarian to determine if the animal is OPEN or remains pregnant.
The pregnant - do not breed code adds cows marked as do not breed to the list for pregnancy checks. The default filter values tell PULSE to add cows with a Reproduction Code of 1 (Do Not Breed) to the first herd check after 35 days since last heat.
The pregnant - heifer code adds heifers to the list for pregnancy checks. The default filter values tell PULSE to add bred heifers to the first herd check after 35 days since last heat.
The pregnant - heifer early recheck code adds heifers to the list for pregnancy rechecks. The default filter values tell PULSE to add pregnant heifers to the first herd check after 55 days into pregnancy.
The confirm heifer code adds heifers to the list for pregnancy confirmation. The default filter values tell PULSE to add heifers to the first herd check after they are confirmed pregnant.
The overdue code is used for animals that are more than 300 days into pregnancy. It is used to make sure overdue animals are not overlooked in the dry pen.
The mid-pregnancy recheck code adds animals to the list for pregnancy checks. The default filter values tell PULSE to add animals to the first herd check after 90 days into pregnancy.
The missed heat code is used for animals for a potentially missed heat. The default filter values tell PULSE to add open animals that are more than 24 days since their last heat. A typical estrus cycle is 21 days, heat to heat, so if you check for pregnancy at 35 days, and the animal was checked open, you know that she has already missed at least 2 heats.
The no heat code is used for animals that were expected to have a heat since their last fresh event. The default filter values tell PULSE to add animals that are more than 40 days in milk and not yet bred.
The cystic code is used for animals showing signs of heat within 10 days of the previous breeding to the list.
NOTE: If an animal is re-bred within 2 days, it is considered the same heat and not suspected cystic behavior.
The XTBRD code is used for animals that are bred multiple times before they become pregnant. The default filter values tell PULSE to add animals to the first herd check after they are bred more than 4 times.
The problem code is used for animals that may be problem breeders and should be added to every herd check until they are pregnant. The default filter values tell PULSE to add animals to the herd check after 120 days in milk until they are pregnant.
The HOPEN code is used for heifers over a specific age that are not yet pregnant. The default filter values tell PULSE to add heifers to the first herd check after they are 14 months old.
After your vetcodes are set, you are ready to Create a Vet ListCreate a Vet List and process your list from web or mobile. See Reports/WorklistsReports/Worklists or Complete TasksComplete Tasks (v2) to learn more about processing your vet list!